[TOC]
iptables其他用法
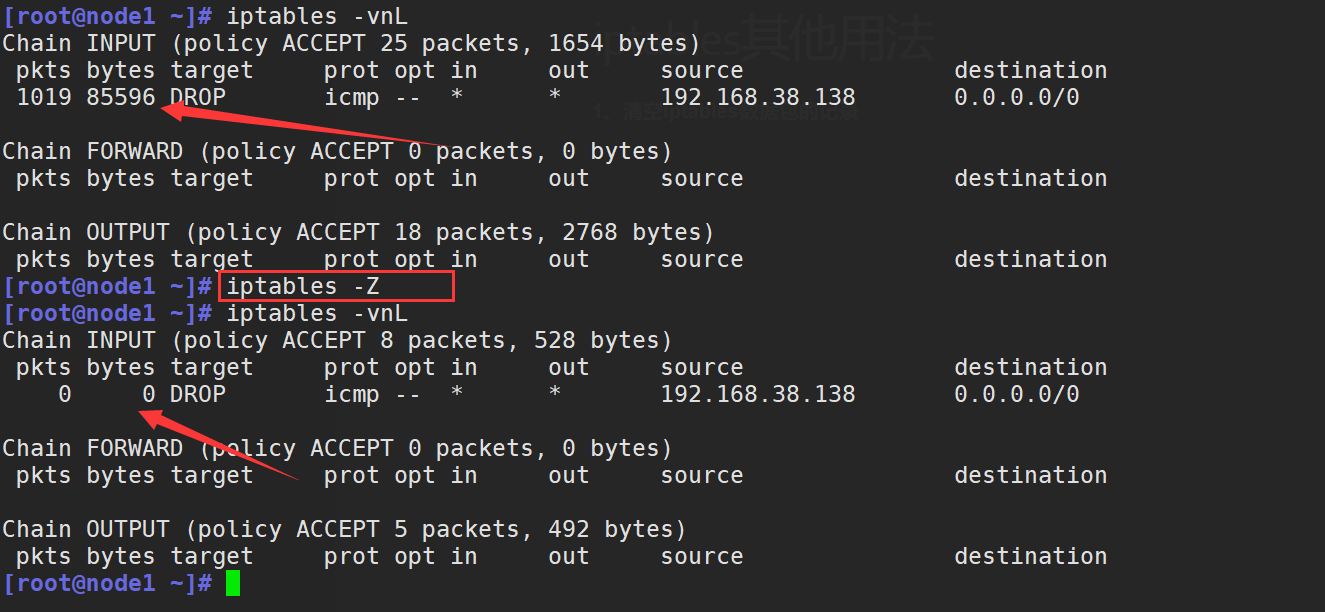
1、清空iptables数据包的记录(-Z)
iptables -Z等价于iptables -t filter:清除所有链的数据包计数,也可以指定链
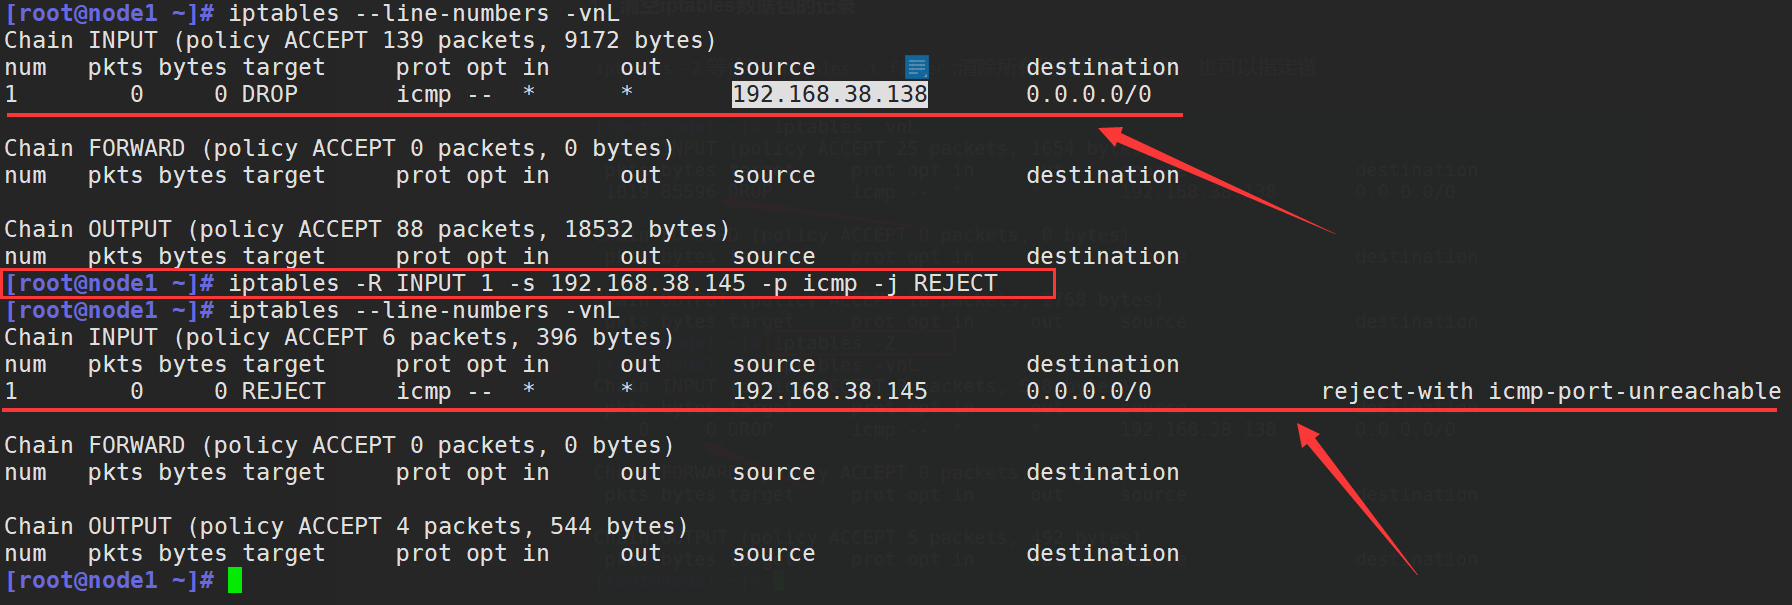
2、修改某一条链(-R)
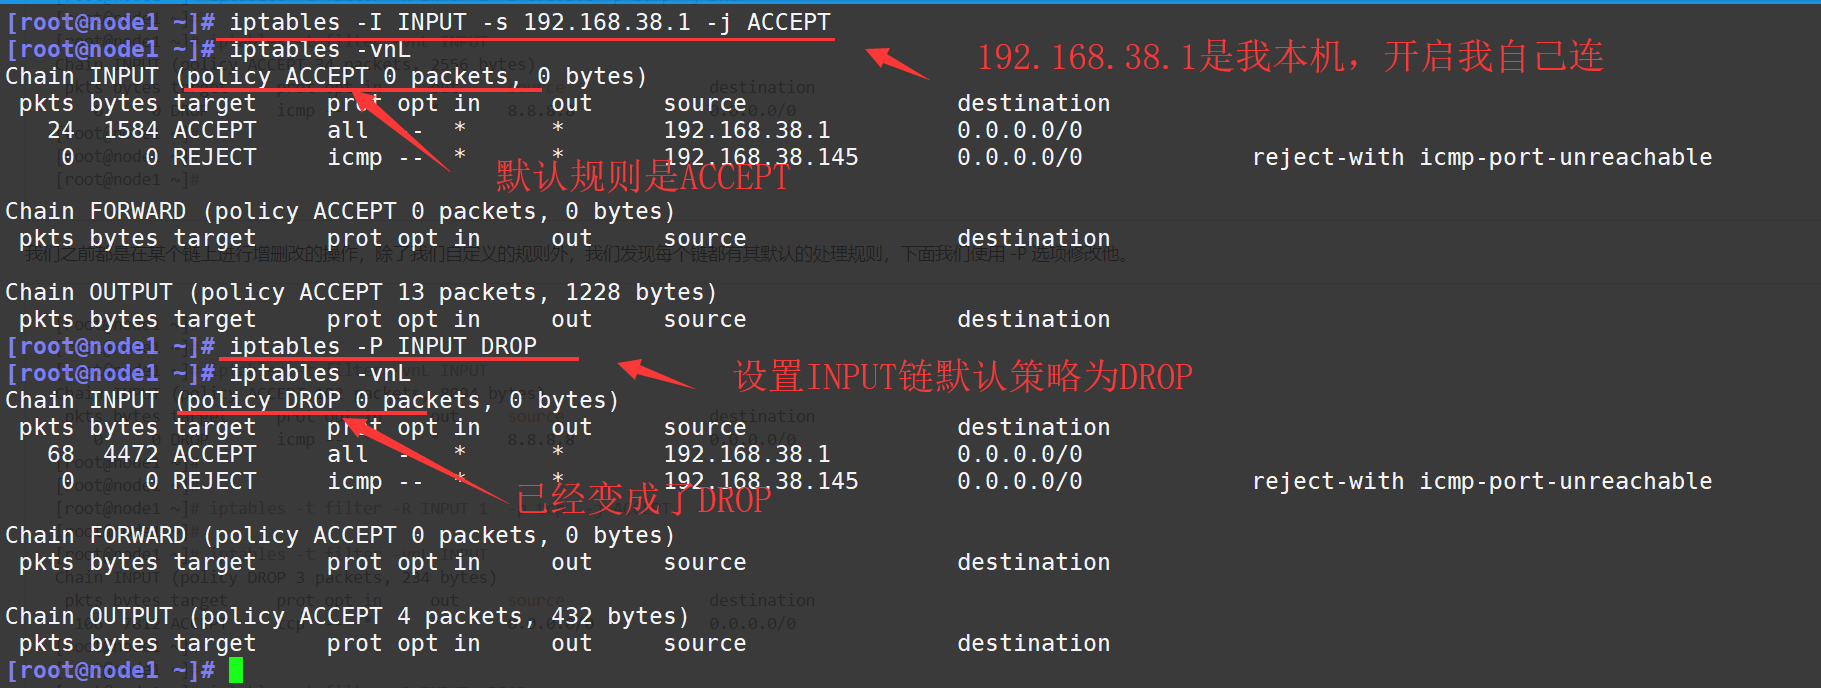
3、设置默认的处理规则(-P)
默认是ACCEPT
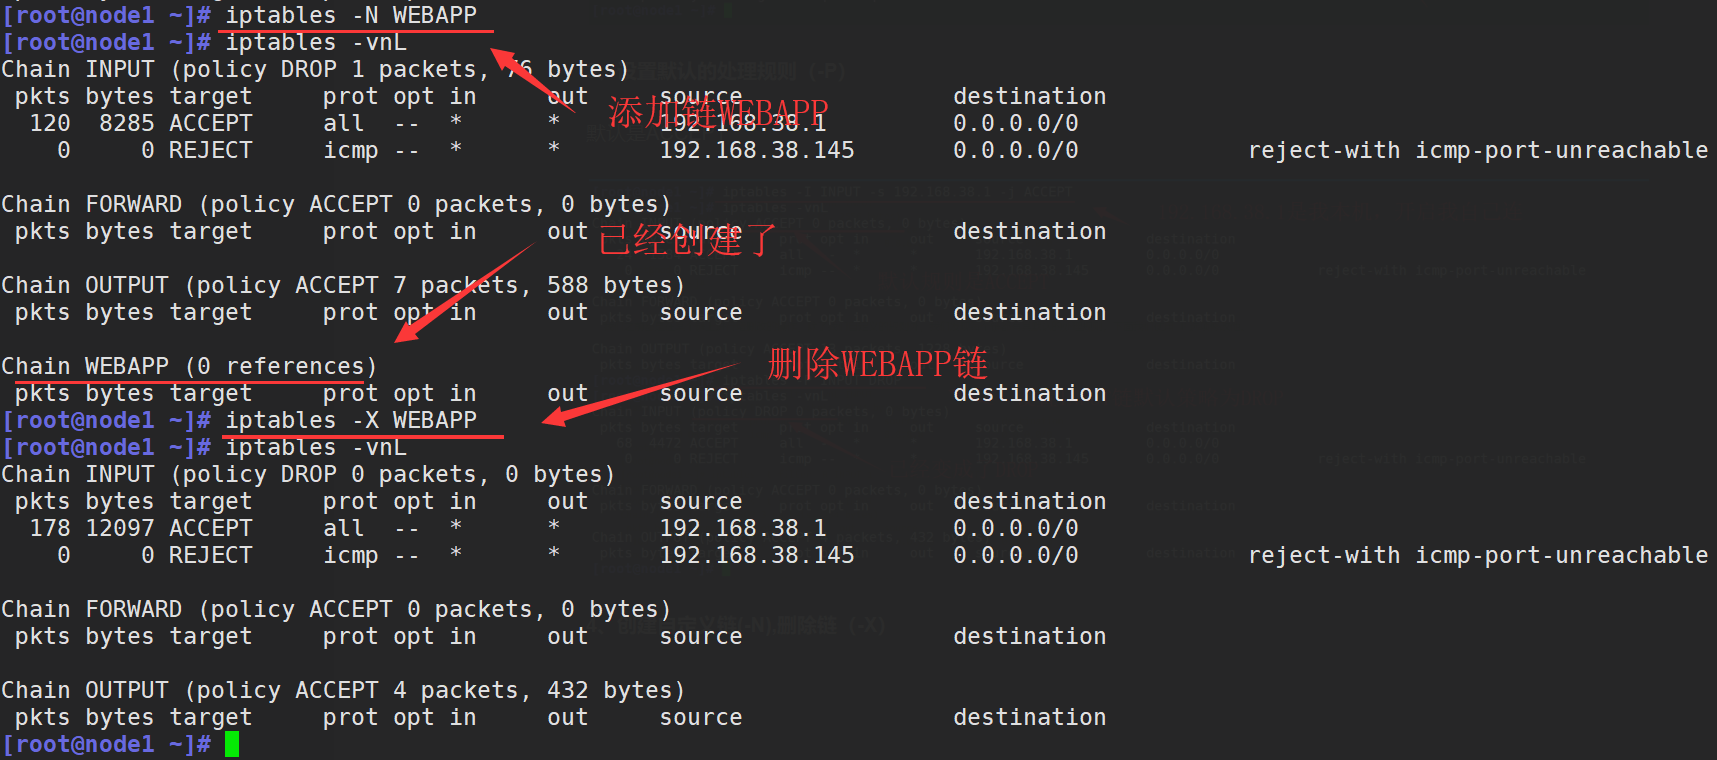
4、创建自定义链(-N),删除链(-X)
5、自定义的链创建规则后要被调用才可以生效,就像函数一样
#创建链,在链上加规则
[root@node1 ~]# iptables -P INPUT ACCEPT	#设置INPUT默认为ACCEPT
[root@node1 ~]# iptables -N WEBAPP
[root@node1 ~]# iptables -I WEBAPP -s 192.168.38.142 -j DROP
[root@node1 ~]# iptables --line-numbers -vnL WEBAPP
Chain WEBAPP (0 references)
num   pkts bytes target     prot opt in     out     source               destination
1        0     0 DROP       all  --  *      *       192.168.38.142       0.0.0.0/0
[root@node1 ~]#

#然而,并没有生效
[root@centos8 ~]# ping -c2 192.168.38.147
PING 192.168.38.147 (192.168.38.147) 56(84) bytes of data.
64 bytes from 192.168.38.147: icmp_seq=1 ttl=64 time=0.337 ms
64 bytes from 192.168.38.147: icmp_seq=2 ttl=64 time=0.347 ms
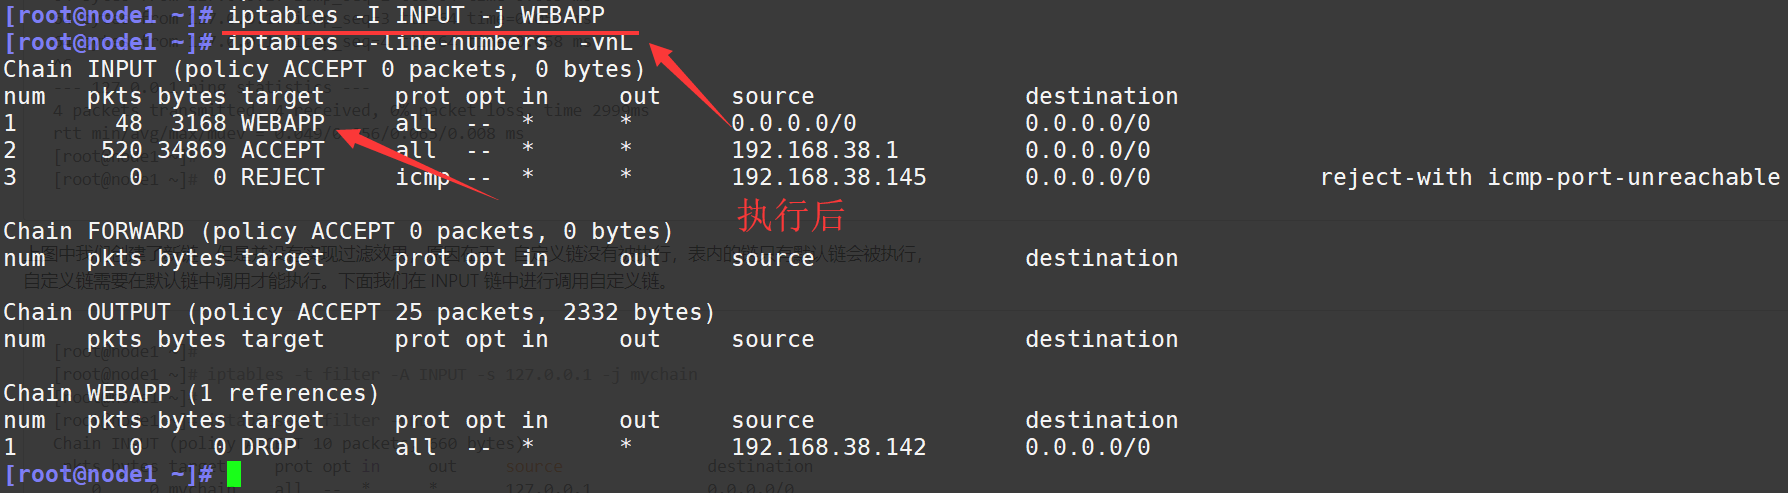
#执行后192.168.38.142不能ping通
[root@centos8 ~]# ping -c2 192.168.38.147
PING 192.168.38.147 (192.168.38.147) 56(84) bytes of data.

--- 192.168.38.147 ping statistics ---
2 packets transmitted, 0 received, 100% packet loss, time 52ms


#但其他主机还能ping通
[root@wp-web2 ~]# ping 192.168.38.147 -c2
PING 192.168.38.147 (192.168.38.147) 56(84) bytes of data.
64 bytes from 192.168.38.147: icmp_seq=1 ttl=64 time=3.03 ms
64 bytes from 192.168.38.147: icmp_seq=2 ttl=64 time=0.349 ms
6、iptables规则持久保存(iptables-save)
一个是iptables -S可以打印规则,但需要一条条手动导入恢复;iptables-save导出的规则可以用iptables-restore恢复*
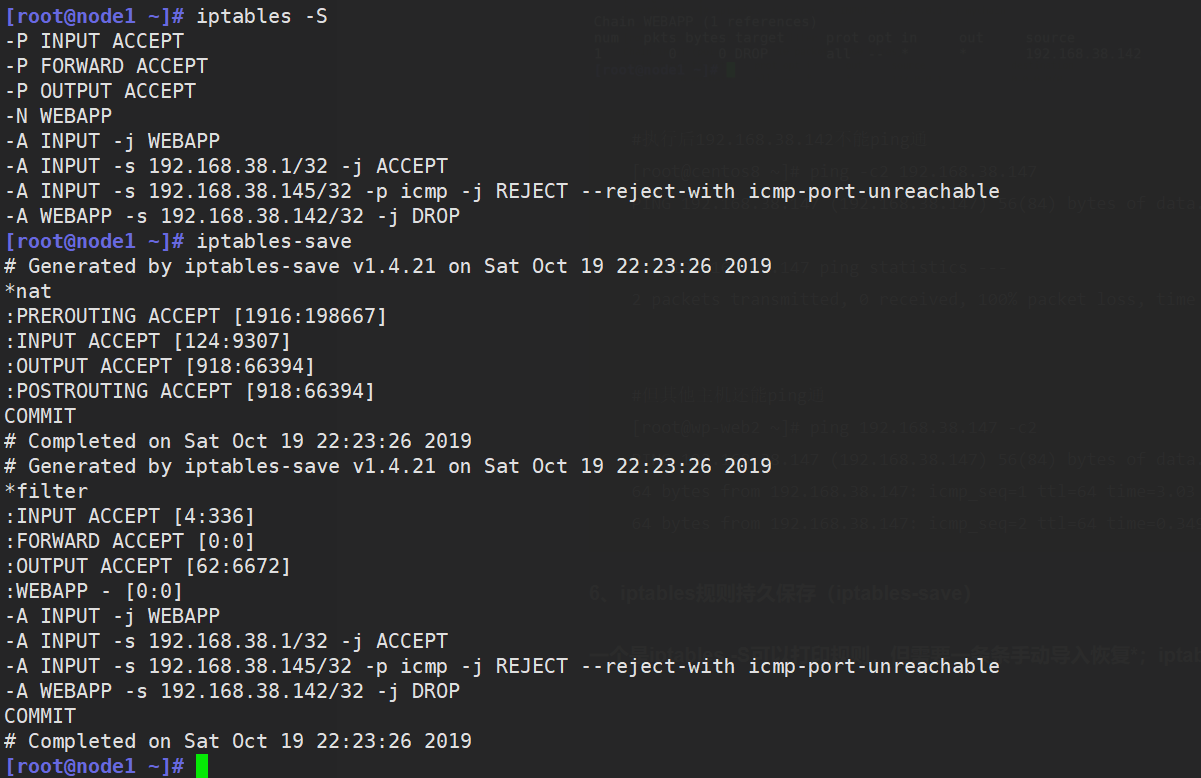
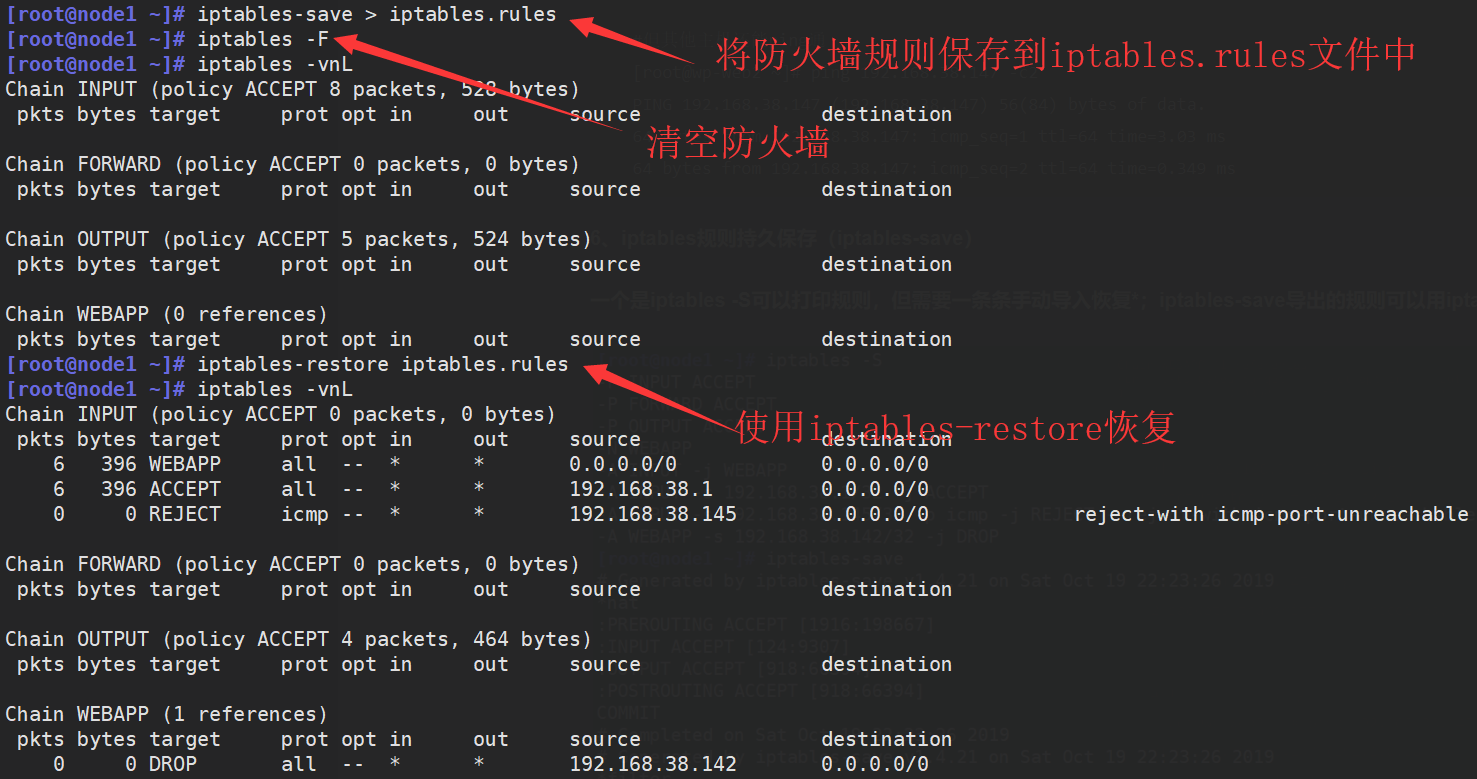
使用iptables-save保存规则并用iptables-restore恢复
[root@node1 ~]# iptables-save > iptables.rules
[root@node1 ~]# iptables -F
[root@node1 ~]# iptables -vnL
Chain INPUT (policy ACCEPT 8 packets, 528 bytes)
 pkts bytes target     prot opt in     out     source               destination

Chain FORWARD (policy ACCEPT 0 packets, 0 bytes)
 pkts bytes target     prot opt in     out     source               destination

Chain OUTPUT (policy ACCEPT 5 packets, 524 bytes)
 pkts bytes target     prot opt in     out     source               destination

Chain WEBAPP (0 references)
 pkts bytes target     prot opt in     out     source               destination
[root@node1 ~]# iptables-restore iptables.rules
[root@node1 ~]# iptables -vnL
Chain INPUT (policy ACCEPT 0 packets, 0 bytes)
 pkts bytes target     prot opt in     out     source               destination
    6   396 WEBAPP     all  --  *      *       0.0.0.0/0            0.0.0.0/0
    6   396 ACCEPT     all  --  *      *       192.168.38.1         0.0.0.0/0
    0     0 REJECT     icmp --  *      *       192.168.38.145       0.0.0.0/0            reject-with icmp-port-unreachable

Chain FORWARD (policy ACCEPT 0 packets, 0 bytes)
 pkts bytes target     prot opt in     out     source               destination

Chain OUTPUT (policy ACCEPT 4 packets, 464 bytes)
 pkts bytes target     prot opt in     out     source               destination

Chain WEBAPP (1 references)
 pkts bytes target     prot opt in     out     source               destination
    0     0 DROP       all  --  *      *       192.168.38.142       0.0.0.0/0
7、使用iptables服务来管理规则
要实现开启自动加载iptables规则,只需三步
#启动iptables服务会使用iptables-save加载/etc/sysconfig/iptables,停止服务会清空iptables规则并设置默认规则为ACCEPT
yum install iptables-services -y
iptables-save > /etc/sysconfig/iptables
systemctl enable iptables
这个iptables服务启动时会从/etc/sysconfig/iptables加载规则,停止服务时会清空iptables表并设置默认策略为ACCEPT
[root@node1 ~]# yum install iptables-services -y
[root@node1 ~]# rpm -ql iptables-services
/etc/sysconfig/iptables
/usr/lib/systemd/system/iptables.service
/usr/libexec/iptables
/usr/libexec/iptables/iptables.init
iptables服务如何管理规则呢,看下启动脚本:
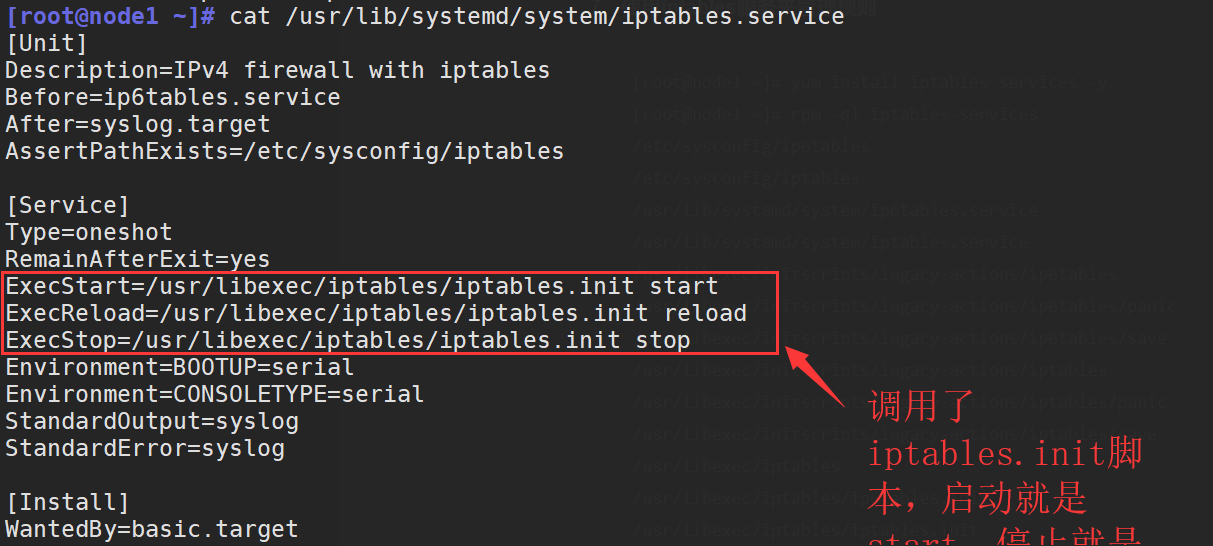
[root@node1 ~]# vim /usr/libexec/iptables/iptables.init
......
IPTABLES=iptables
IPTABLES_DATA=/etc/sysconfig/$IPTABLES
IPTABLES_RESTORE_CMD="$IPTABLES-restore"
IPV=${IPTABLES%tables}
PROC_IPTABLES_NAMES=/proc/net/${IPV}_tables_names
......

#stop函数
stop() {
    local ret=0

    # Do not stop if iptables module is not loaded.	#判断模块是否加载
    [ ! -e "$PROC_IPTABLES_NAMES" ] && return 0

    # Set default chain policy to ACCEPT, in order to not break shutdown
    # on systems where the default policy is DROP and root device is
    # network-based (i.e.: iSCSI, NFS)
    set_policy ACCEPT
    let ret+=$?
    # And then, flush the rules and delete chains
    flush_n_delete
    let ret+=$?

    rm -f $VAR_SUBSYS_IPTABLES
    return $ret
}

#start函数
start() {
......
# Do not start if there is no config file.
    if [ ! -f "$IPTABLES_DATA" ]; then
        echo -n $"${IPTABLES}: No config file."; warning; echo
        return 6
    fi
......
    [ "x$IPTABLES_SAVE_COUNTER" = "xyes" ] && OPT="-c"	#设置了一个参数-c,-c用于保存或加载iptables数据表的计数
    $IPTABLES_RESTORE_CMD $OPT $IPTABLES_DATA		#从配置文件恢复iptables规则
......
}
8、仅开放本机的22,80,443端口,允许本机流量出去
[root@node1 ~]# iptables -I INPUT -p tcp -m multiport --dport 22,80,443 -j ACCEPT
[root@node1 ~]# iptables -A INPUT -m state --state ESTABLISHED,RELATED -j ACCEPT
[root@node1 ~]# iptables -A OUTPUT -m state --state ESTABLISHED,RELATED -j ACCEPT
[root@node1 ~]# iptables -A INPUT -j DROP
9、开启连接追踪
#有这个模块即可
[root@node1 ~]# lsmod | grep nf_conntrack
nf_conntrack_ipv4      15053  3
nf_defrag_ipv4         12729  1 nf_conntrack_ipv4
nf_conntrack          133095  6 ip_vs,nf_nat,xt_connlimit,nf_nat_ipv4,xt_conntrack,nf_conntrack_ipv4
libcrc32c              12644  4 xfs,ip_vs,nf_nat,nf_conntrack
#必要的话设置那个记录的最大连接值,可以考虑写入sysctl.conf
/proc/sys/net/nf_conntrack_max
10、加载ftp追踪模块
[root@node1 ~]# modprobe nf_conntrack_ftp
[root@node1 ~]# lsmod | grep nf_conntrack_ftp
nf_conntrack_ftp       18638  0
nf_conntrack          133095  7 ip_vs,nf_nat,xt_connlimit,nf_nat_ipv4,xt_conntrack,nf_conntrack_ftp,nf_conntrack_ipv4
11、开启iptables日志记录
#默认会将日志记录在message中,如哟UI需要,可以
#echo 'kern.warning  /var/log/iptables.log' >> /etc/rsyslog.conf  && systemctl restart rsyslog
[root@node1 ~]# iptables -I INPUT -p tcp --dport 80 -J LOG --log-prefix "new connections: "
[root@node1 ~]# tail /var/log/messages  -f
Oct 19 07:39:49 node1 kernel: new connections: IN=eth0 OUT= MAC=00:0c:29:2b:76:2e:00:0c:29:5e:09:71:08:00 SRC=192.168.38.147 DST=192.168.38.136 LEN=60 TOS=0x00 PREC=0x00 TTL=64 ID=48856 DF PROTO=TCP SPT=42942 DPT=80 WINDOW=29200 RES=0x00 SYN URGP=0
12、iptables规则设置建议
任何不允许的访问,应该在请求到达时给予拒绝
规则在链接上的次序即为其检查时的生效次序

基于上述,规则优化:
1. 安全放行所有入站和出站的状态为 ESTABLISHED 状态连接
2. 谨慎放行入站的新请求
3. 有特殊目的限制访问功能,要在放行规则之前加以拒绝
4. 同类规则(访问同一应用),匹配范围小的放在前面,用于特殊处理
5. 不同类的规则(访问不同应用),匹配范围大的放在前面
6. 应该将那些可由一条规则能够描述的多个规则合并为一条
7. 设置默认策略,建议白名单(只放行特定连接)
8. iptables -P,不建议使用,建议在规则的最后定义规则做为默认策略
13、iptables实现SNAT
根据那个图,用户请求流量会先抵达PREROUTING,经路由表判断是本机流量则走INPUT链,不是则走FORWARD链
因此,应该在
SNAT:源地址转换,iptables对出去的流量做源地址转换,让数据表有去有回
DNAT:目的地址转换,iptables对来的流量目的地址转换,方便让它进入内网
14、iptables将本机的9000端口转发到内网的192.168.38.138:80
#其实用到了DNAT和SNAT,把进来的流量改目的IP,出去的流量改源IP
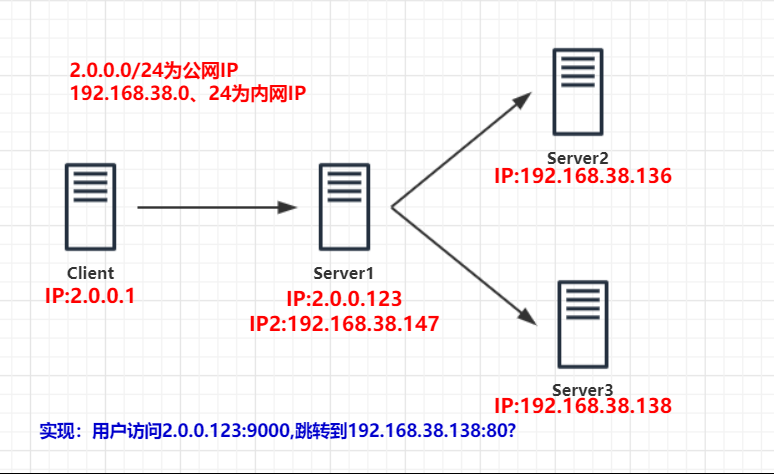
[root@server1 ~]# iptables -t nat -A PREROUTING  -p tcp --dport 9000   -j DNAT --to-destination 192.168.38.138:80
[root@server1 ~]# iptables -t nat -R POSTROUTING 1 -j MASQUERADE
15、转发本地的8080端口到80端口
#使用到了REDIRECT,专门转发本地的
iptables -t nat -A PREROUTING -p tcp --dport 8080 -j REDIRECT --to-ports 80