harbor官方部署教程(v1.9.3)
官方手册:https://github.com/goharbor/harbor/blob/master/docs/user_guide.md (为啥这个页面这么耗CPU)
遇到的问题:harbor同步时那个域名必须要用DNS解析,hosts文件不行的
和之前稍微有点不一样了,之前用的1.7
github项目地址:https://github.com/goharbor/harbor
安装和配置指南:https://github.com/goharbor/harbor/blob/master/docs/installation_guide.md
本次安装采用离线包安装,宿主机ubuntu。docker19.03,内存4G,并配置https。整个安装过程及其简单:
1、装好docker和docker-compose
2、从上面的github项目下载离线安装包
3、解压安装包,修改配置文件
4、执行脚本一键安装
一、安装docker和docker-compose
略
root@qqq:~# sudo curl -L "https://github.com/docker/compose/releases/download/1.25.0/docker-compose-$(uname -s)-$(uname -m)" -o /usr/local/bin/docker-compose
root@qqq:~# sudo chmod +x /usr/local/bin/docker-compose
二、github下载harbor离线安装包
wget https://github.com/goharbor/harbor/releases/download/v1.9.3/harbor-offline-installer-v1.9.3.tgz
三、解压,配置
root@qqq:~# tar xf /home/qqq/harbor-offline-installer-v1.9.3.tgz -C /usr/local/
root@qqq:~# ll /usr/local/harbor/
total 623376
drwxr-xr-x  2 root root      4096 Dec  4 06:54 ./
drwxr-xr-x 11 root root      4096 Dec  4 06:54 ../
-rw-r--r--  1 root root 638288840 Nov 14 11:23 harbor.v1.9.3.tar.gz
-rw-r--r--  1 root root      5805 Nov 14 11:23 harbor.yml
-rwxr-xr-x  1 root root      5088 Nov 14 11:23 install.sh*
-rw-r--r--  1 root root     11347 Nov 14 11:23 LICENSE
-rwxr-xr-x  1 root root      1748 Nov 14 11:23 prepare*
harbor.yml
hostname: harbor.uscwifi.xyz
http:
  port: 80
https:            #开启https
  port: 443
  certificate: /usr/local/harbor/ssl/harbor.uscwifi.xyz.pem   #证书
  private_key: /usr/local/harbor/ssl/harbor.uscwifi.xyz.key
harbor_admin_password: harbor1234566    #harbor管理密码,用户名admin
database:
  password: nrEssyMjE8ScdZRW              #数据库密码
  max_idle_conns: 50
  max_open_conns: 100
data_volume: /data                      #data存储位置
clair:
  updaters_interval: 12
jobservice:
  max_job_workers: 10
notification:
  webhook_job_max_retry: 10
chart:
  absolute_url: disabled
log:
  level: info
  local:
    rotate_count: 50
    rotate_size: 200M
    location: /var/log/harbor
_version: 1.9.0
proxy:
  http_proxy:
  https_proxy:
  no_proxy: 127.0.0.1,localhost,.local,.internal,log,db,redis,nginx,core,portal,postgresql,jobservice,registry,registryctl,clair
  components:
    - core
    - jobservice
    - clair
四、执行脚本安装
root@qqq:/usr/local/harbor# ./install.sh
整个过程分四步
1、检查docker和docker-compose
[Step 0]: checking installation environment ...

Note: docker version: 19.03.5

Note: docker-compose version: 1.25.0
2、拉镜像
[Step 1]: loading Harbor images ...
47a4bb1cfbc7: Loading layer [==================================================>]  34.26MB/34.26MB
f93c083be5bc: Loading layer [==================================================>]  9.009MB/9.009MB
bf1b03029526: Loading layer [==================================================>]  44.41MB/44.41MB
3395eb0db37a: Loading layer [==================================================>]  2.048kB/2.048kB
630606b67737: Loading layer [==================================================>]  3.072kB/3.072kB
b59ccb3639e4: Loading layer [==================================================>]  44.41MB/44.41MB
Loaded image: goharbor/chartmuseum-photon:v0.9.0-v1.9.3
......
3、准备环境
生成各种配置文件,其中包括nginx.conf和docker-compose.yml
[Step 2]: preparing environment ...
prepare base dir is set to /usr/local/harbor
Generated configuration file: /config/log/logrotate.conf
Generated configuration file: /config/log/rsyslog_docker.conf
Generated configuration file: /config/nginx/nginx.conf
Generated configuration file: /config/core/env
Generated configuration file: /config/core/app.conf
Generated configuration file: /config/registry/config.yml
Generated configuration file: /config/registryctl/env
Generated configuration file: /config/db/env
Generated configuration file: /config/jobservice/env
Generated configuration file: /config/jobservice/config.yml
Generated and saved secret to file: /secret/keys/secretkey
Generated certificate, key file: /secret/core/private_key.pem, cert file: /secret/registry/root.crt
Generated configuration file: /compose_location/docker-compose.yml
Clean up the input dir
4、docker-compose启动服务
[Step 3]: starting Harbor ...
Creating network "harbor_harbor" with the default driver
Creating harbor-log ... done
Creating harbor-portal ... done
Creating registryctl   ... done
Creating redis         ... done
Creating harbor-db     ... done
Creating registry      ... done
Creating harbor-core   ... done
Creating nginx             ... done
Creating harbor-jobservice ... done

✔ ----Harbor has been installed and started successfully.----

Now you should be able to visit the admin portal at https://harbor.uscwifi.xyz.
For more details, please visit https://github.com/goharbor/harbor .
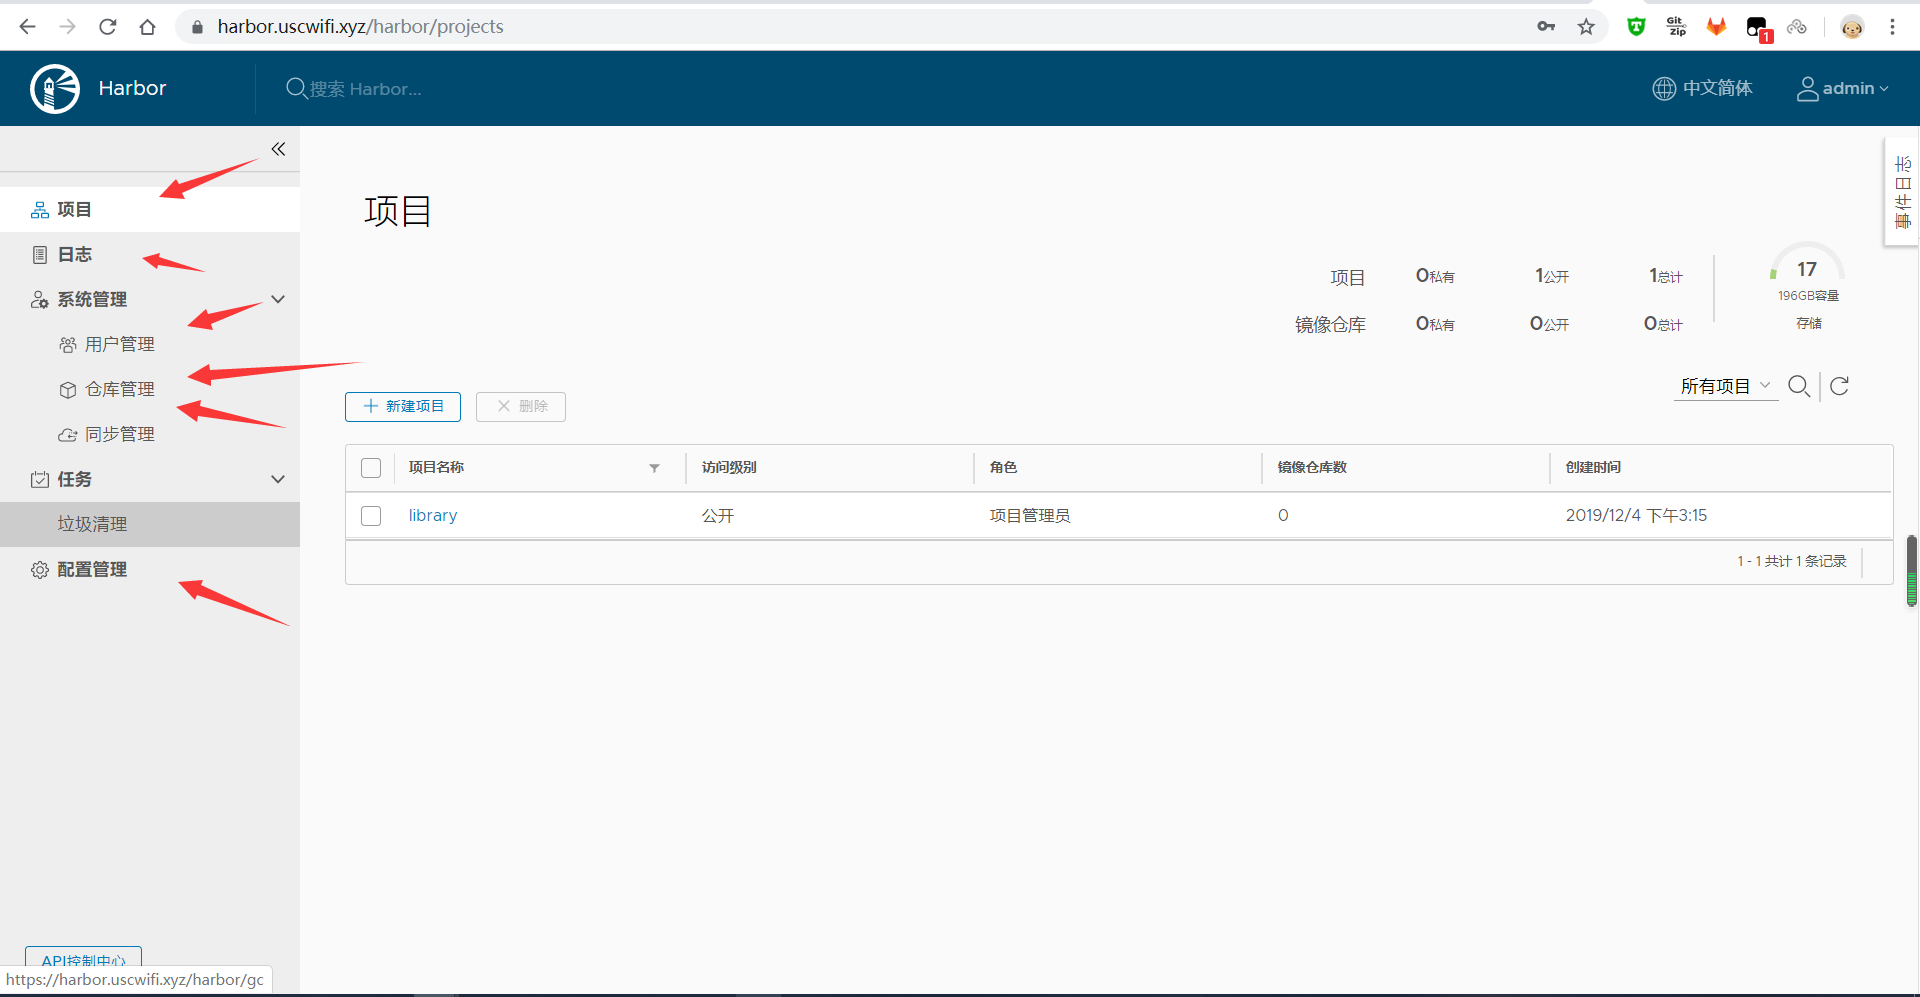
五、web界面访问
六、怎么推送镜像
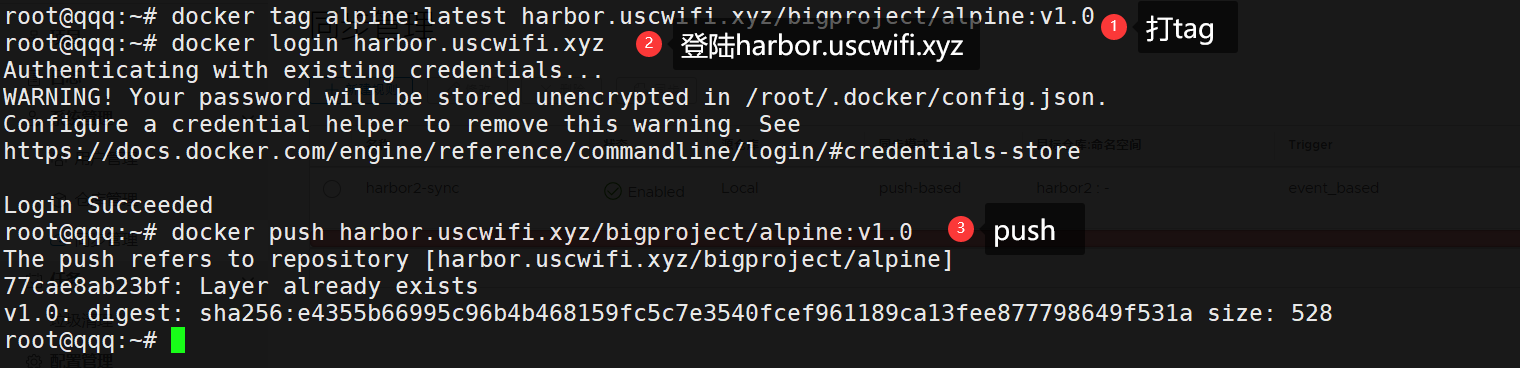
创建用户 -> 创建项目(注册中心)-> 项目授权 -> docker login -> docker tag -> docker push
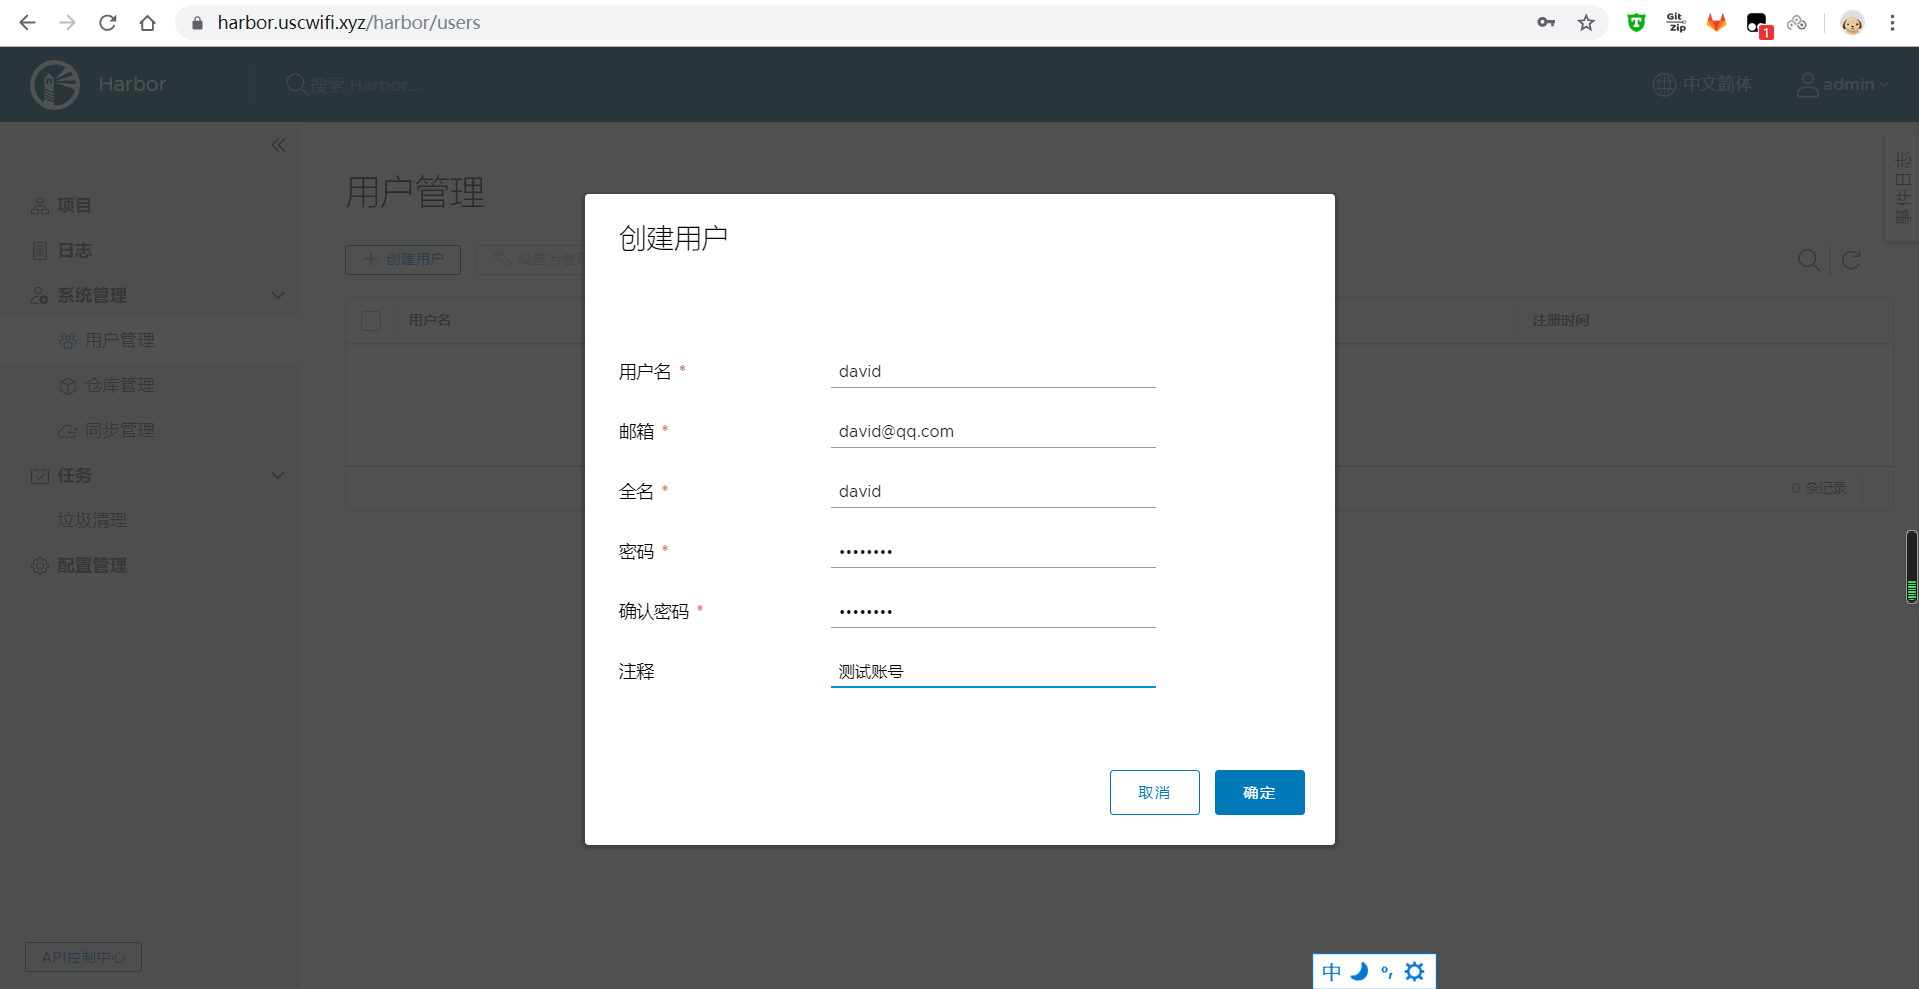
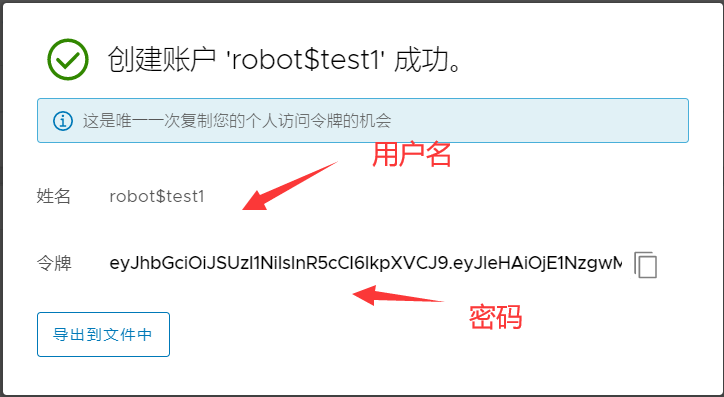
创建用户
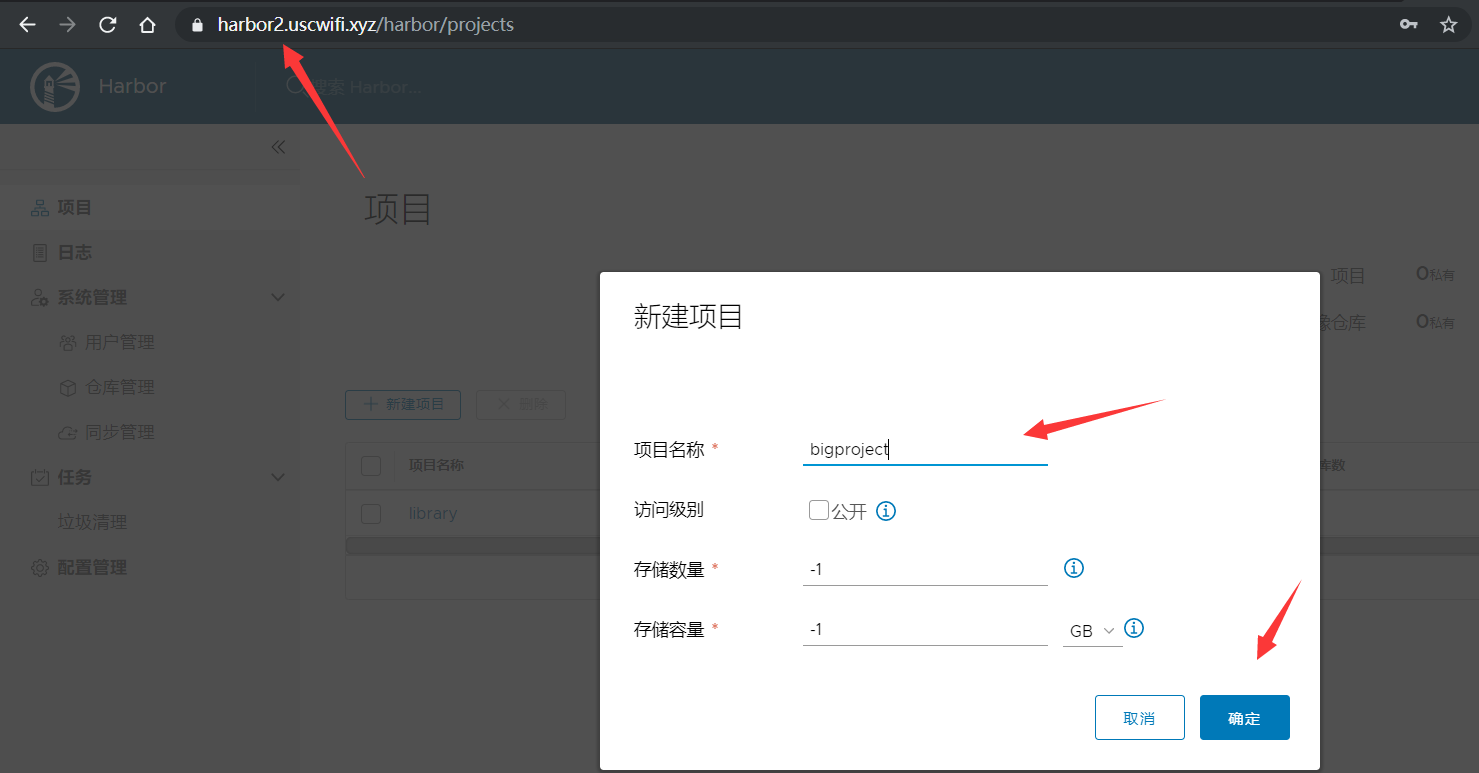
创建项目
该项目就像dockerhub一样,可以放各种镜像。公共的意思表示大家都可以访问

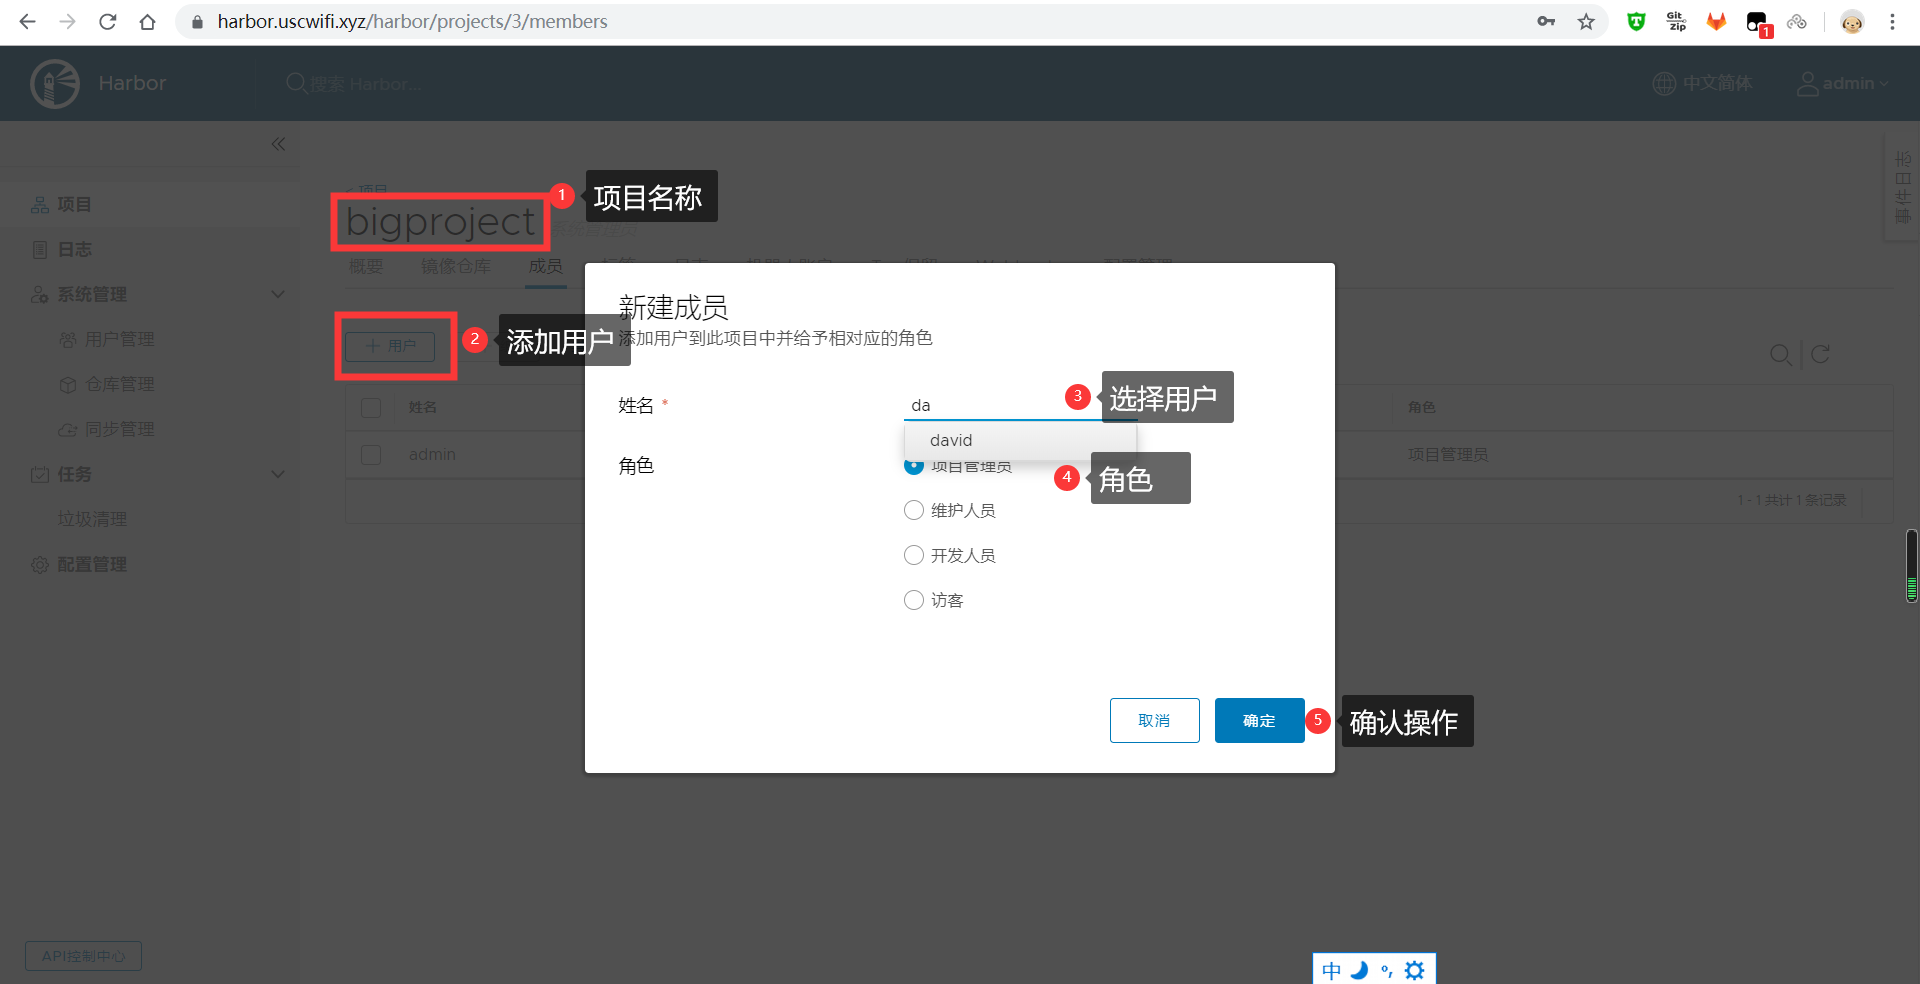
项目授权
管理员拥有绝对权限,普通用户必须授权
docker登陆harbor
root@qqq:~# docker login harbor.uscwifi.xyz
Username: david
Password:
WARNING! Your password will be stored unencrypted in /root/.docker/config.json.
Configure a credential helper to remove this warning. See
https://docs.docker.com/engine/reference/commandline/login/#credentials-store

Login Succeeded
镜像打标签
root@qqq:~# docker tag alpine:latest harbor.uscwifi.xyz/bigproject/alpine:latest
push镜像
root@qqq:~# docker push  harbor.uscwifi.xyz/bigproject/alpine:latest
The push refers to repository [harbor.uscwifi.xyz/bigproject/alpine]
77cae8ab23bf: Pushed
latest: digest: sha256:e4355b66995c96b4b468159fc5c7e3540fcef961189ca13fee877798649f531a size: 528
拉取镜像
因为项目设置的公开,所以知道的人都能拉
[root@openvpn ~]# docker pull harbor.uscwifi.xyz/bigproject/alpine:latest
latest: Pulling from bigproject/alpine
Digest: sha256:e4355b66995c96b4b468159fc5c7e3540fcef961189ca13fee877798649f531a
Status: Downloaded newer image for harbor.uscwifi.xyz/bigproject/alpine:latest
harbor.uscwifi.xyz/bigproject/alpine:latest
[root@openvpn ~]# docker image ls harbor.uscwifi.xyz/bigproject/alpine
REPOSITORY                             TAG                 IMAGE ID            CREATED             SIZE
harbor.uscwifi.xyz/bigproject/alpine   latest              965ea09ff2eb        5 weeks ago         5.55MB
设置项目不公开

[root@openvpn ~]# docker pull harbor.uscwifi.xyz/bigproject/alpine:latest
Error response from daemon: pull access denied for harbor.uscwifi.xyz/bigproject/alpine, repository does not exist or may require 'docker login': denied: requested access to the resource is denied
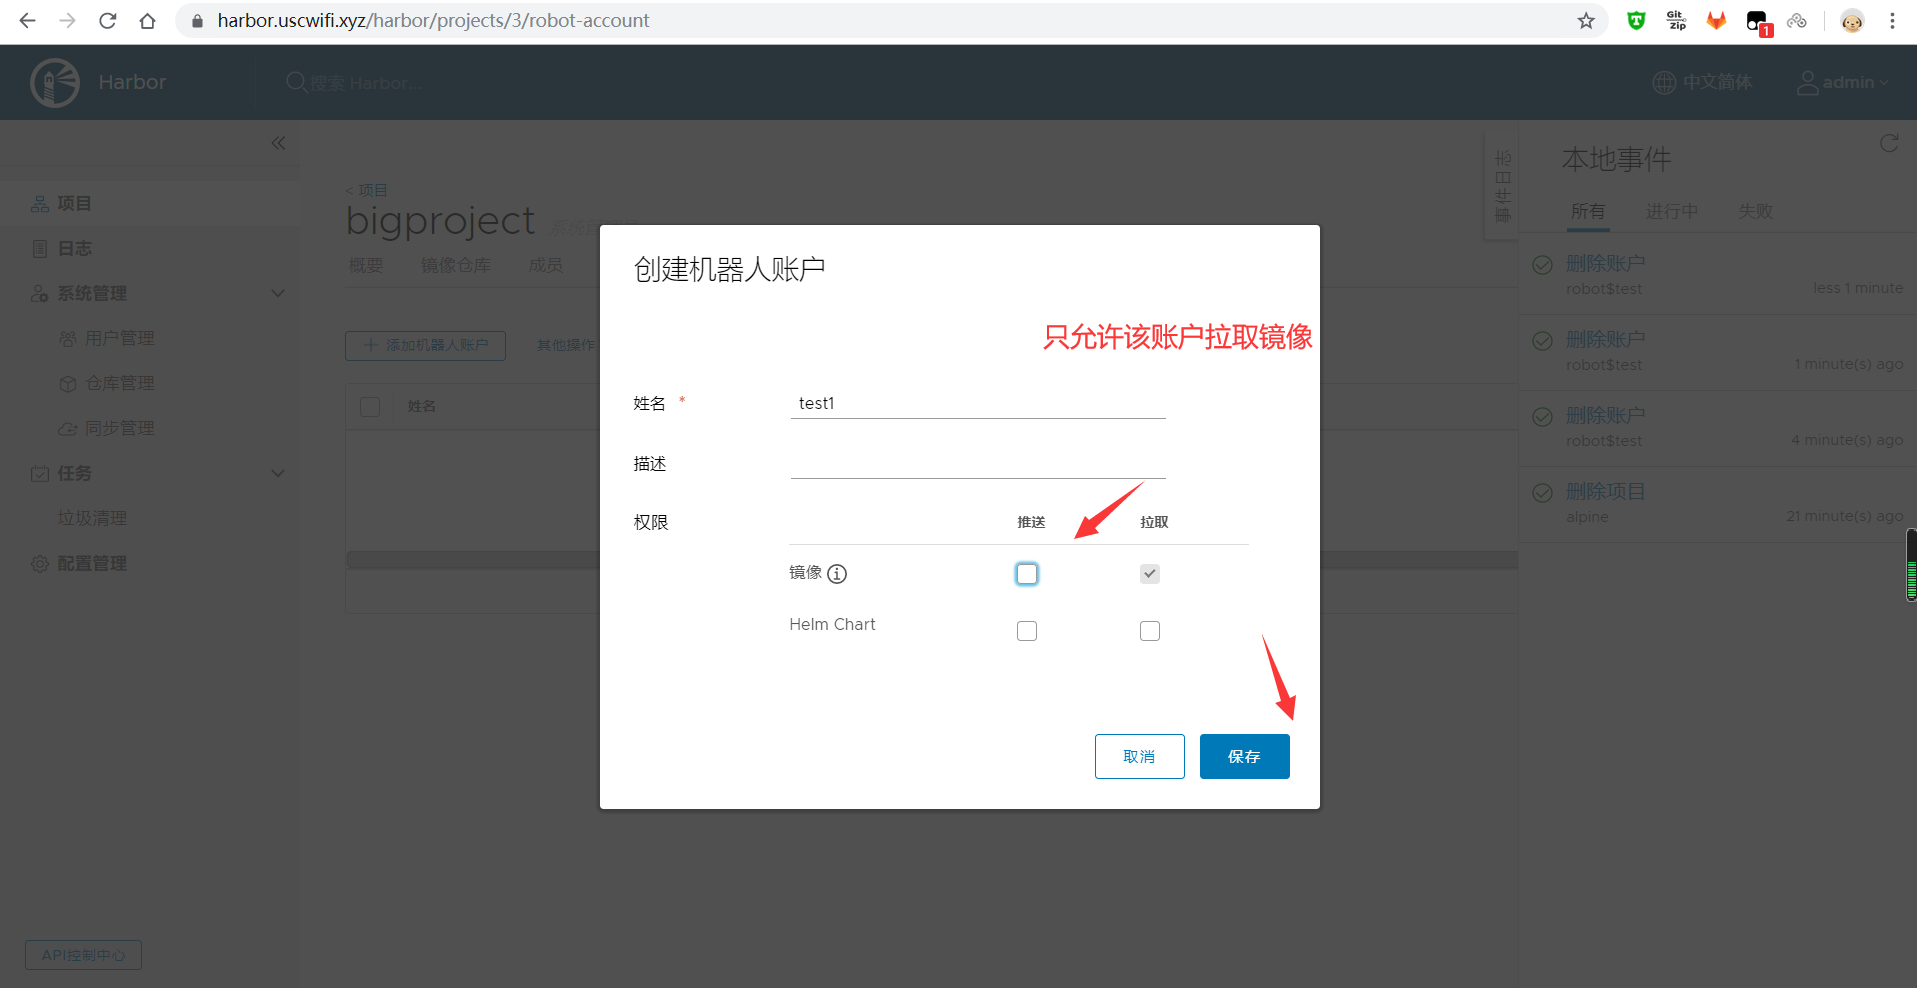
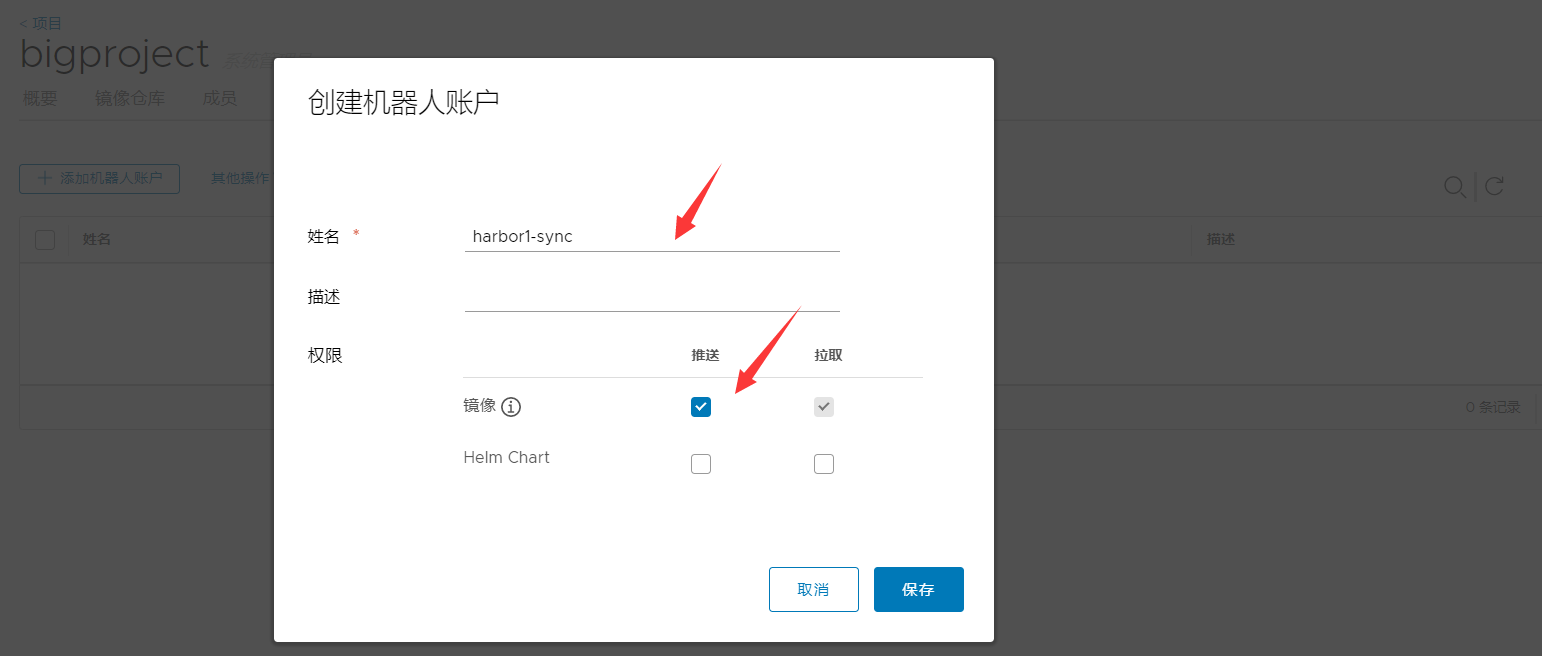
七、机器人账户
创建机器人账户,授权其下载或者上传镜像
测试
[root@openvpn ~]# docker pull harbor.uscwifi.xyz/bigproject/alpine:latest
latest: Pulling from bigproject/alpine
Digest: sha256:e4355b66995c96b4b468159fc5c7e3540fcef961189ca13fee877798649f531a
Status: Image is up to date for harbor.uscwifi.xyz/bigproject/alpine:latest
harbor.uscwifi.xyz/bigproject/alpine:latest
#登出
[root@openvpn ~]# docker logout harbor.uscwifi.xyz
Removing login credentials for harbor.uscwifi.xyz
[root@openvpn ~]# docker pull harbor.uscwifi.xyz/bigproject/alpine:latest
Error response from daemon: pull access denied for harbor.uscwifi.xyz/bigproject/alpine, repository does not exist or may require 'docker login': denied: requested access to the resource is denied
八、webhook
可以即使获取registry上镜像变化情况
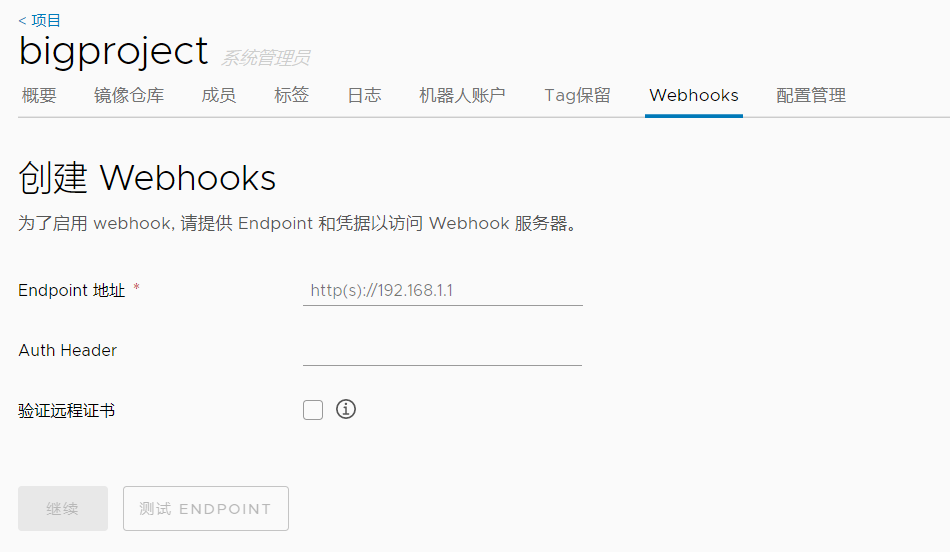
这个暂时不搞,需要开发给接口
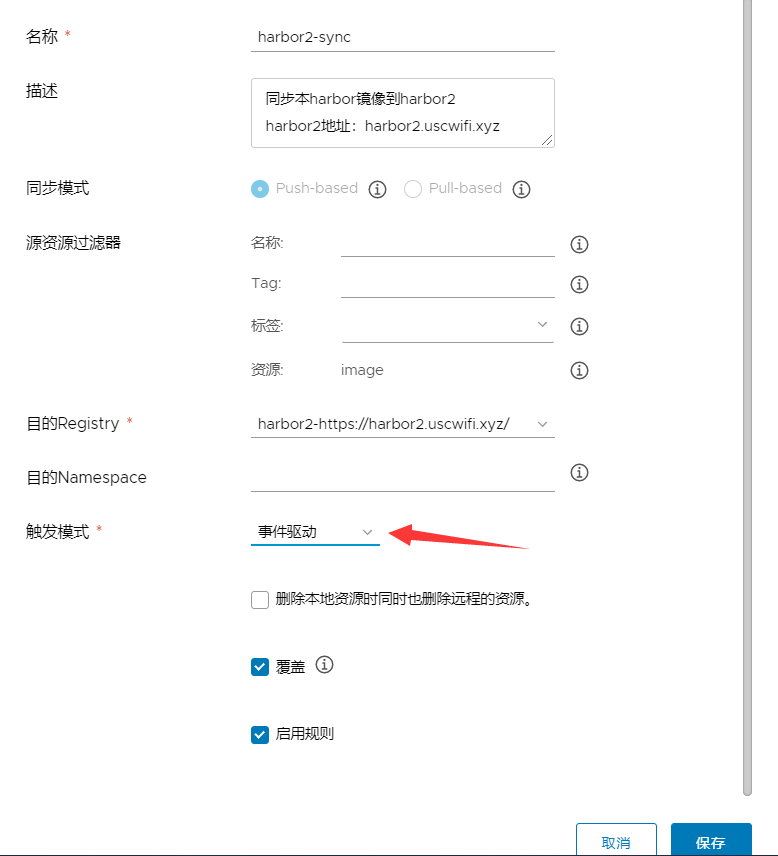
九、两个harbor之间同步
在第二个harbor上建立同样的项目
在第二个harbor上创建机器人用户
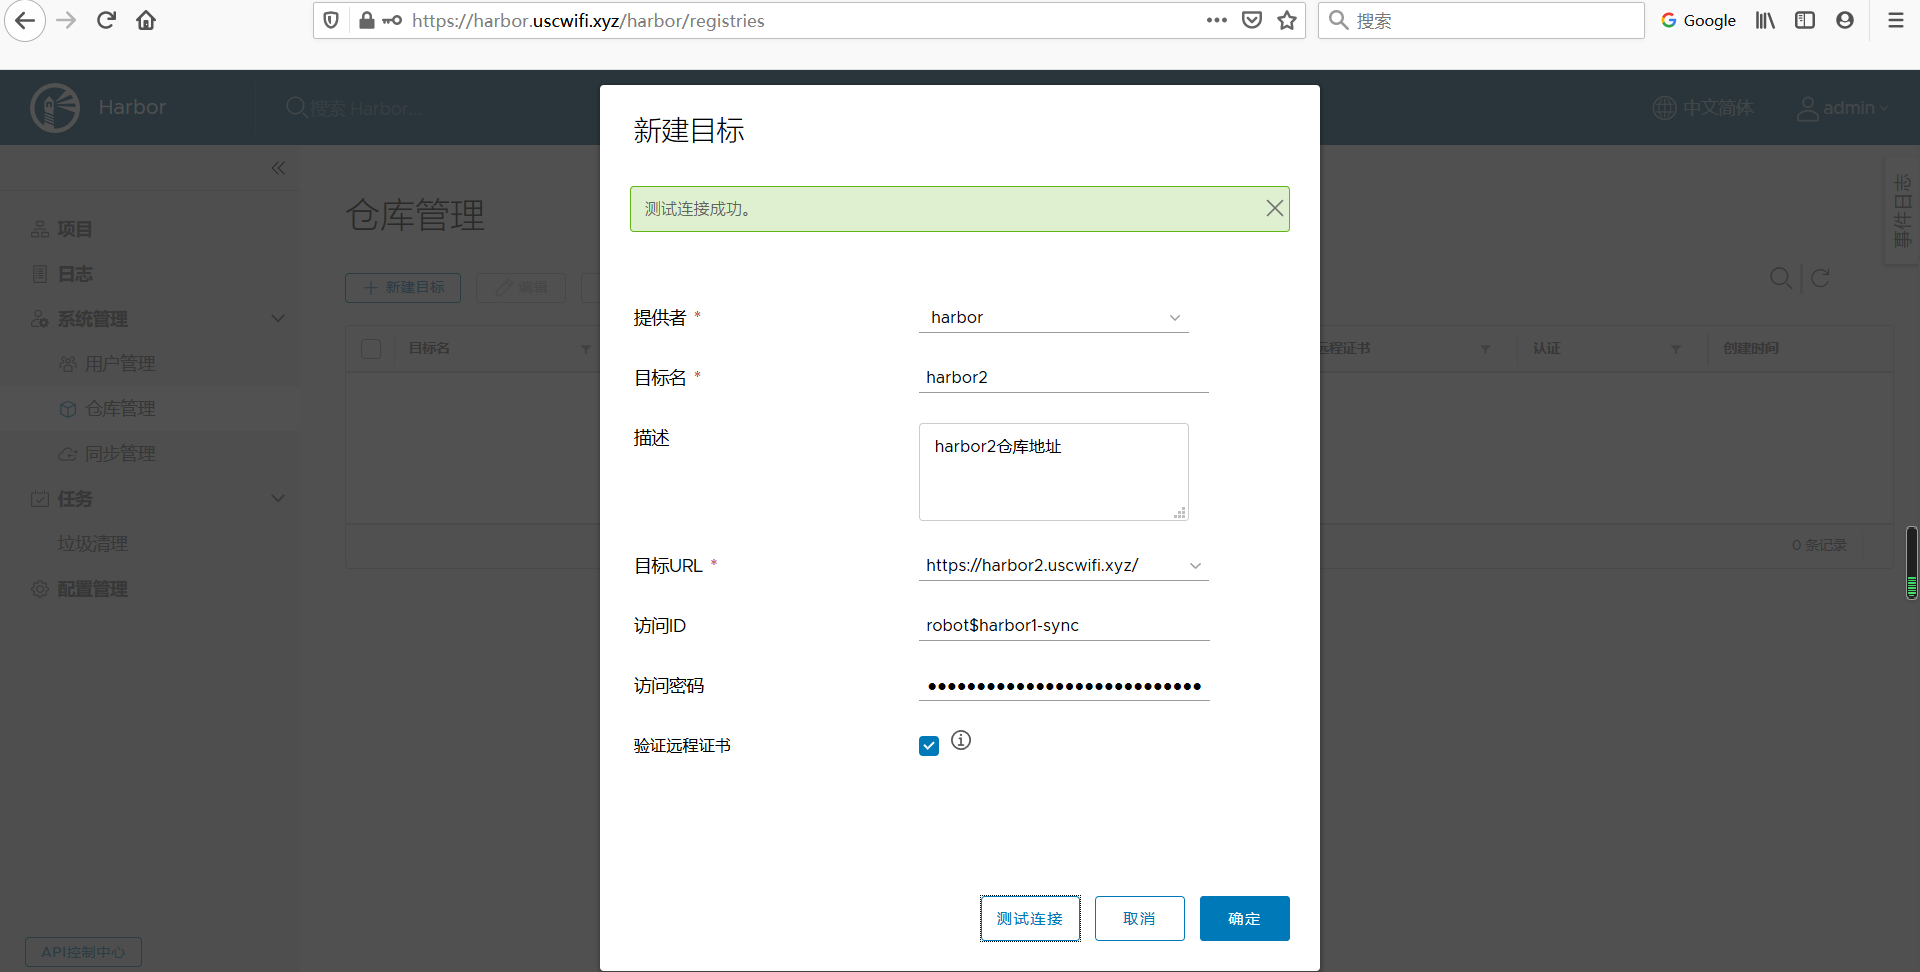
harbor1上创建远程仓库,指向harbor2
这里他娘的踩坑了啊,注意;这个本地hosts解析竟然无效,总是测试连接失败,最终控制台上设置DNS解析生效
参考:https://www.cnblogs.com/linyaonie/p/11238375.html
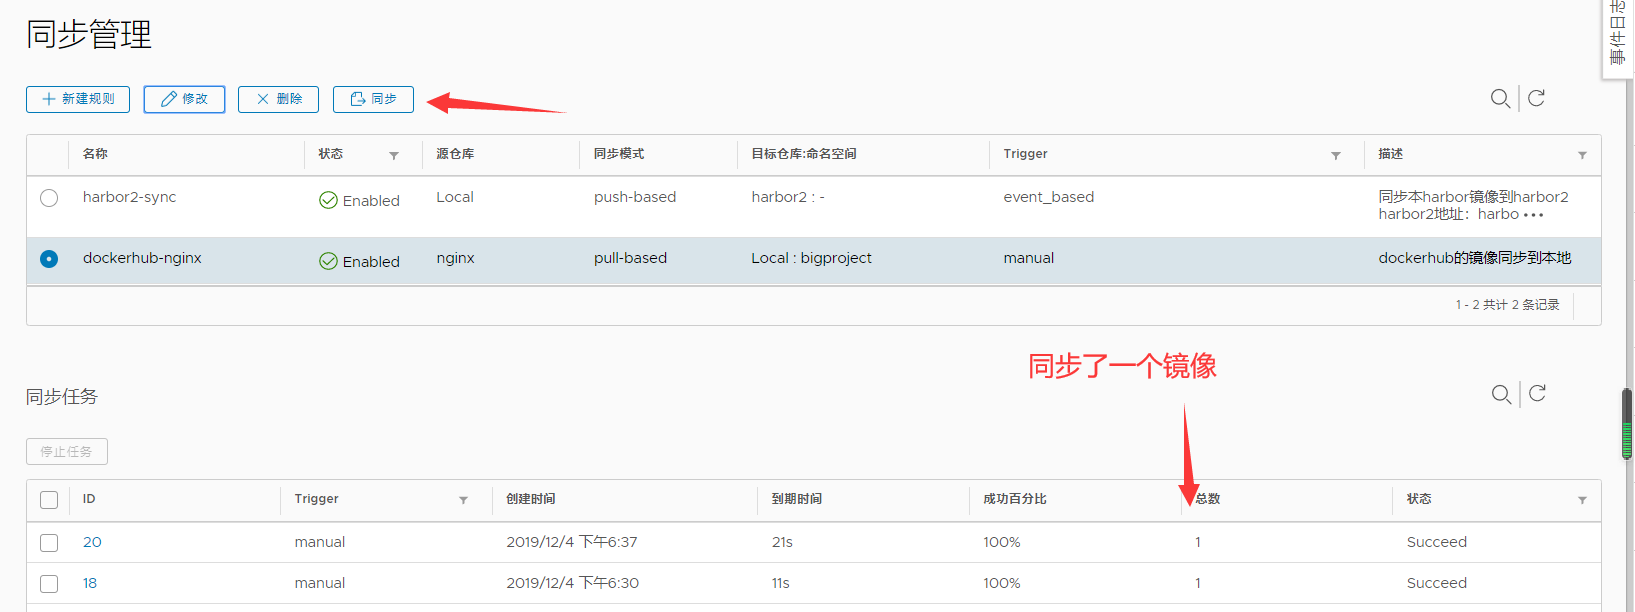
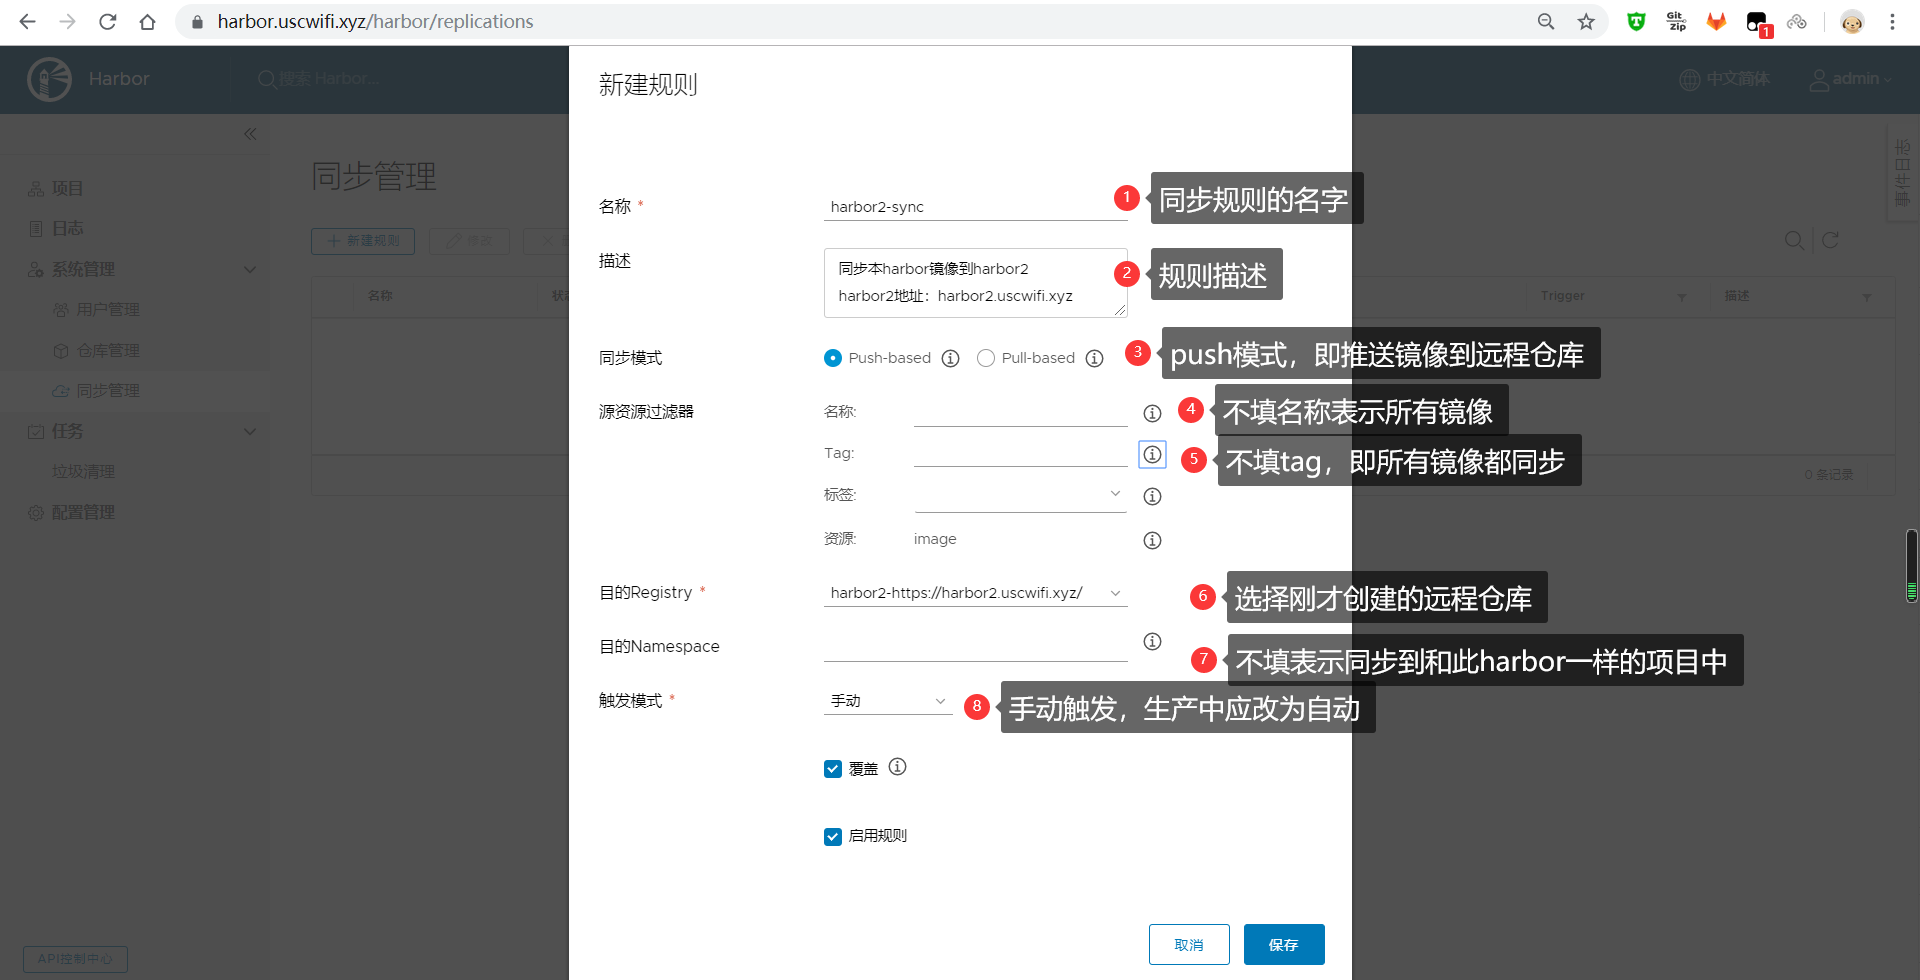
harbor1上创建同步规则
手动点击同步
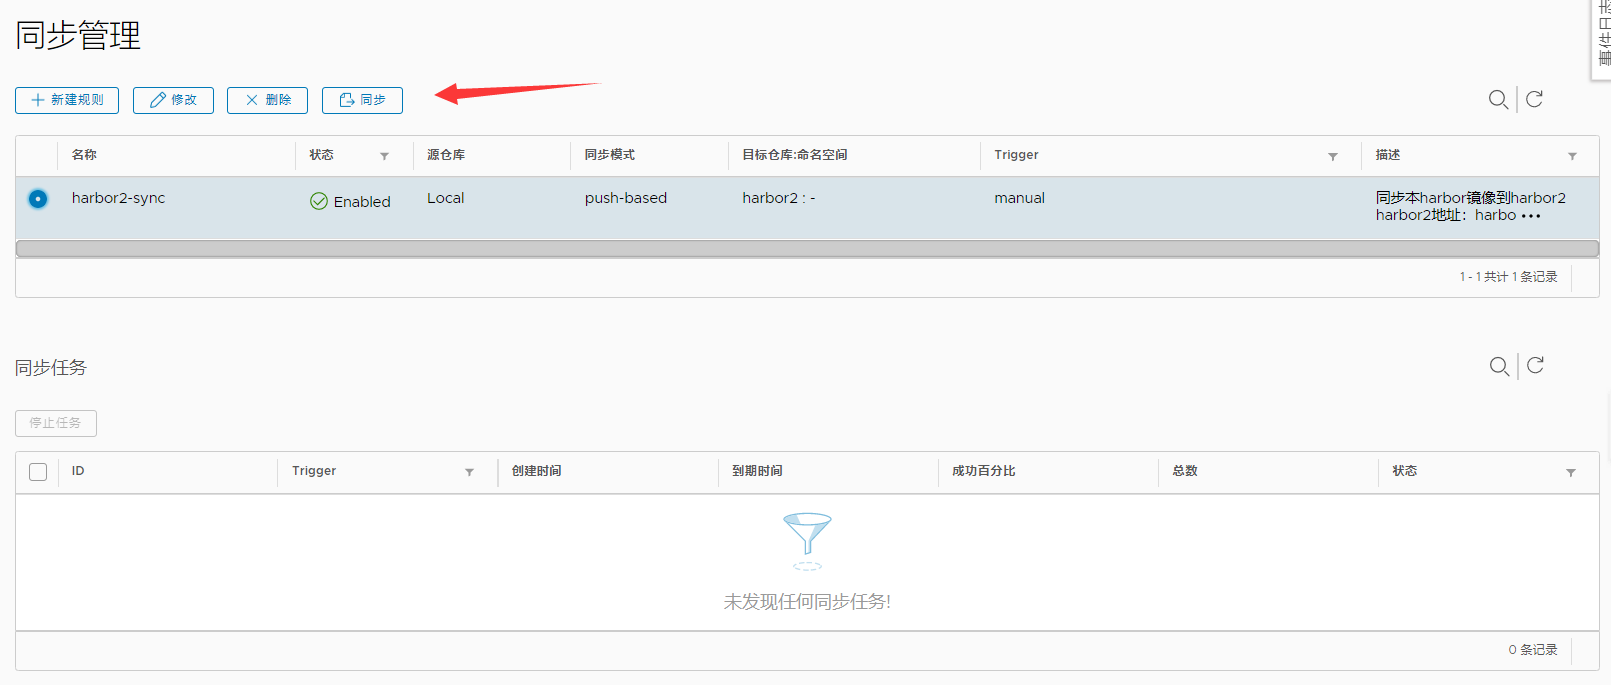
显示同步了一个

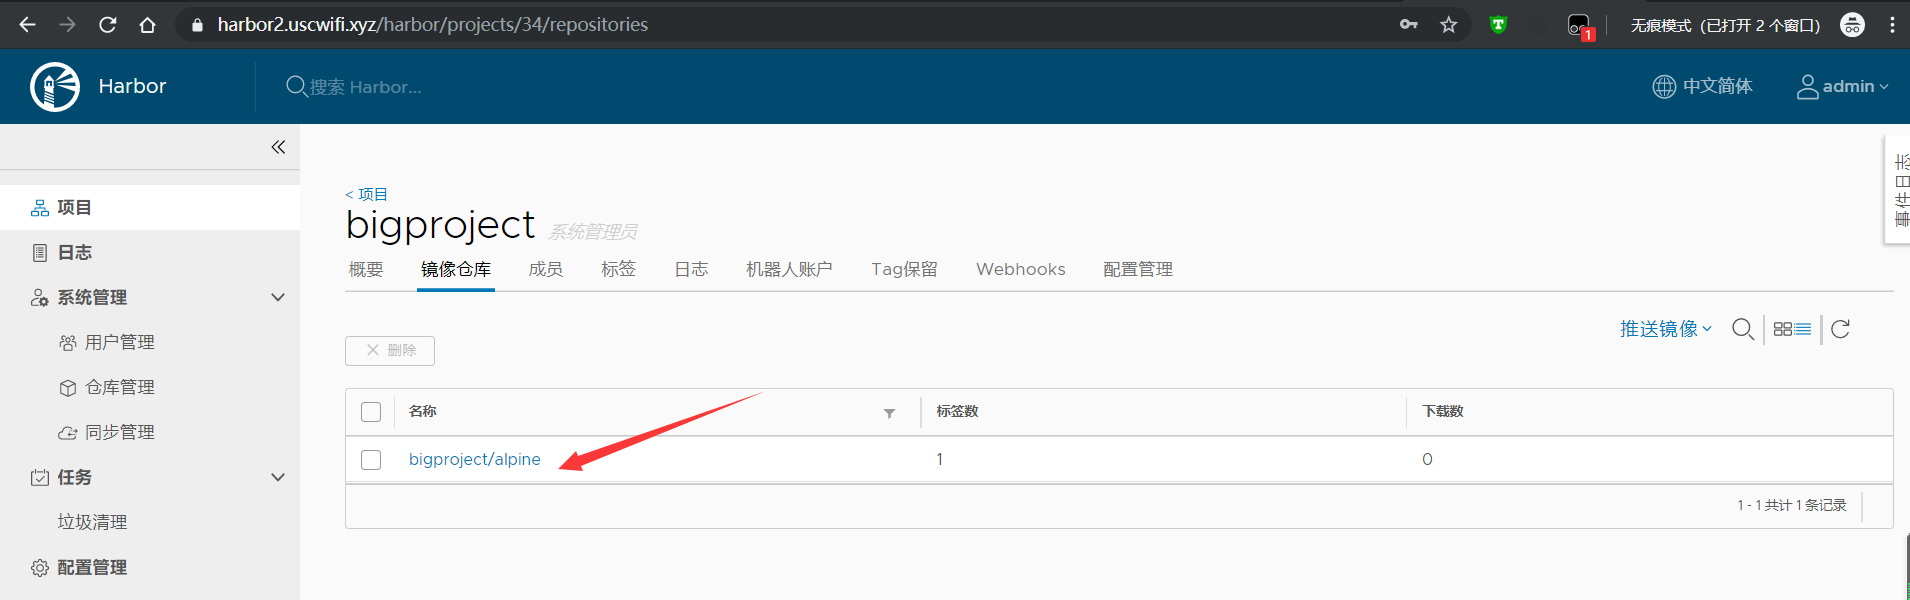
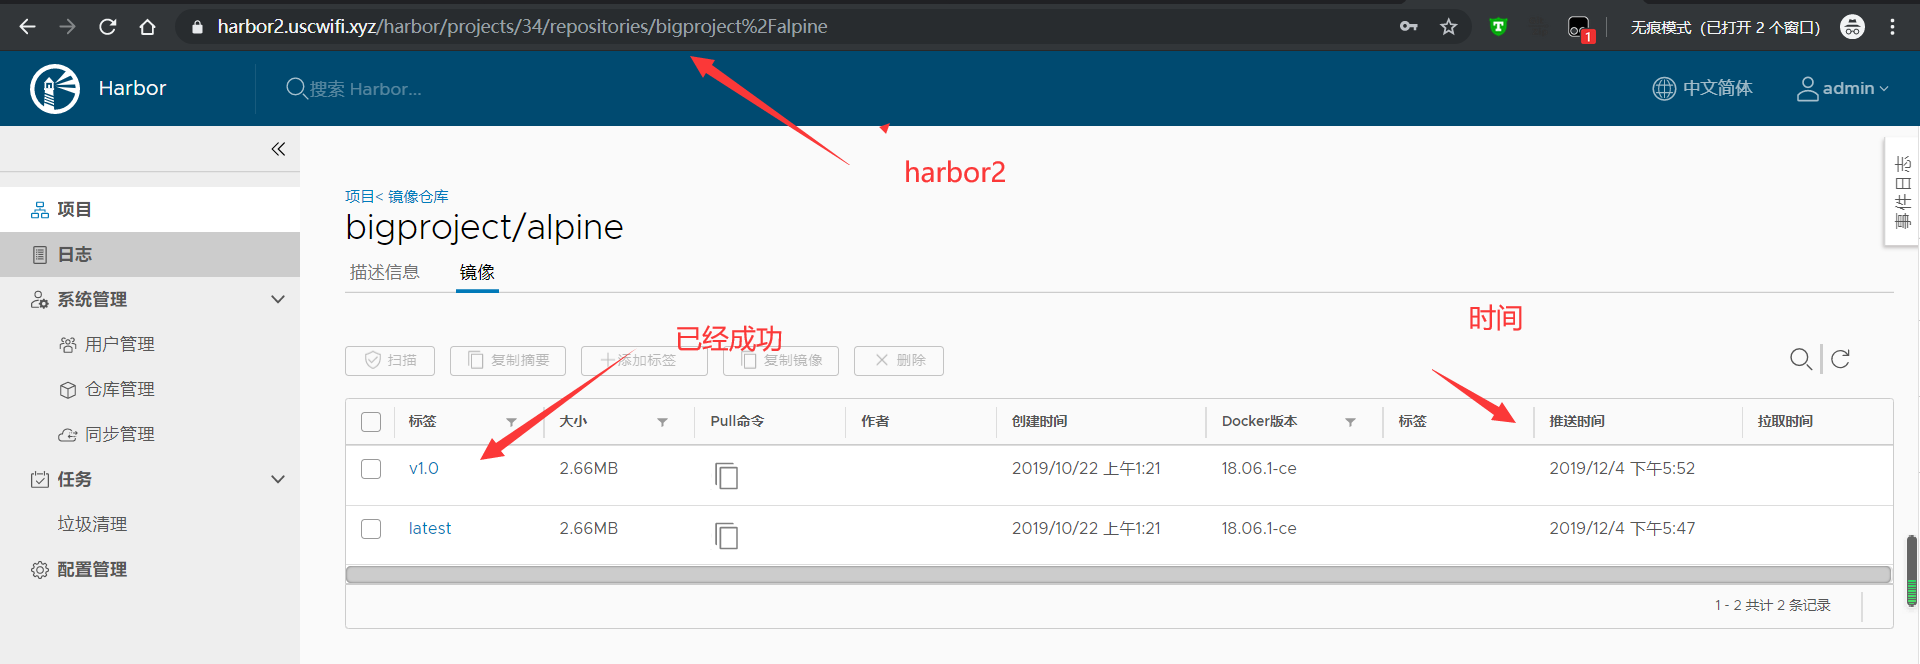
harbor2查看
修改同步规则为事件驱动,但删除操作不同步
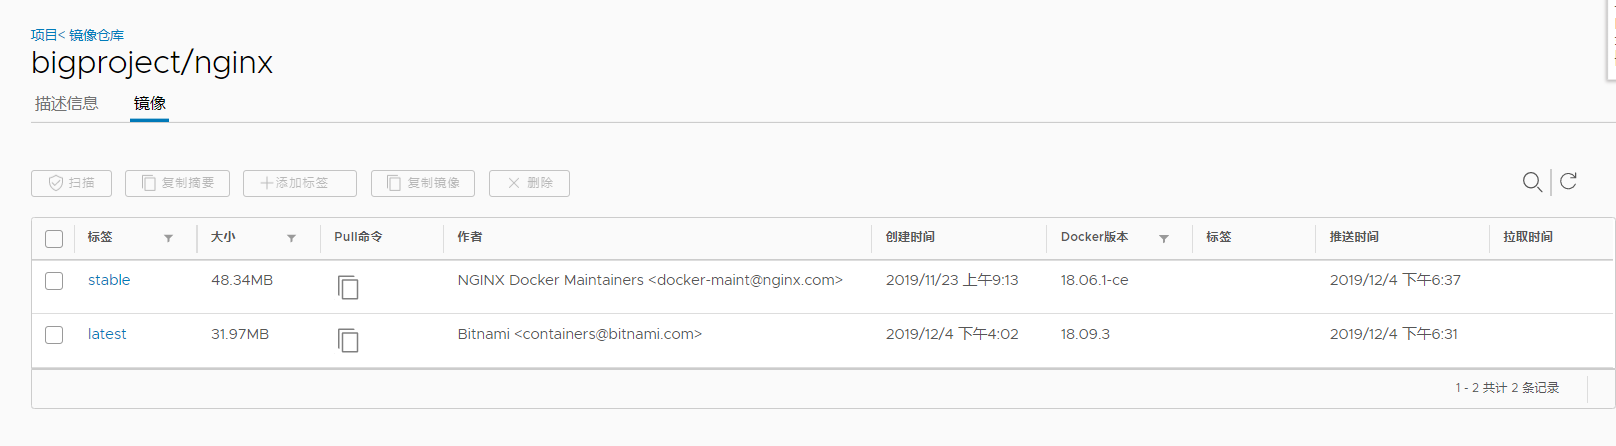
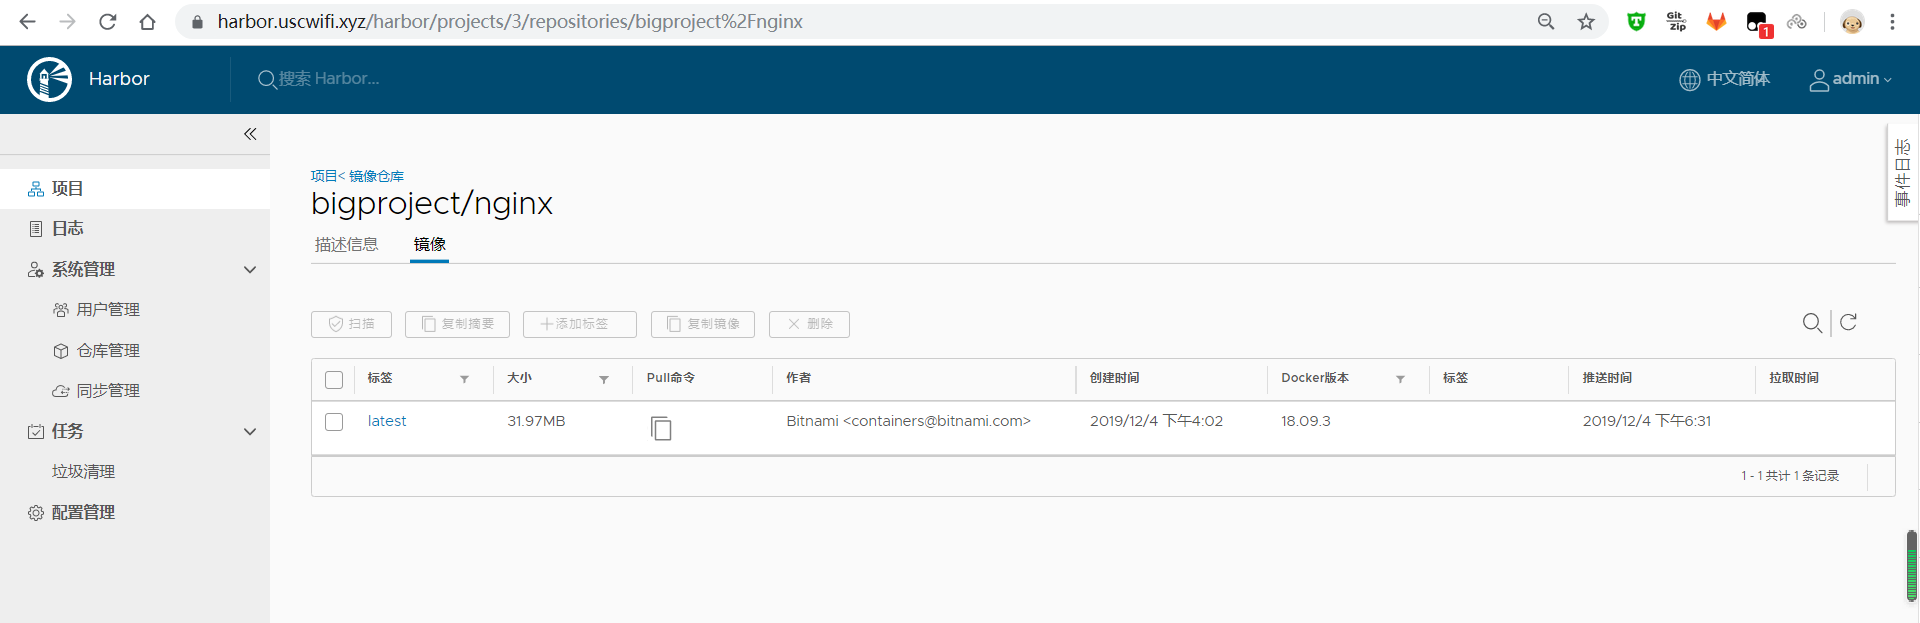
查看harbor仓库镜像
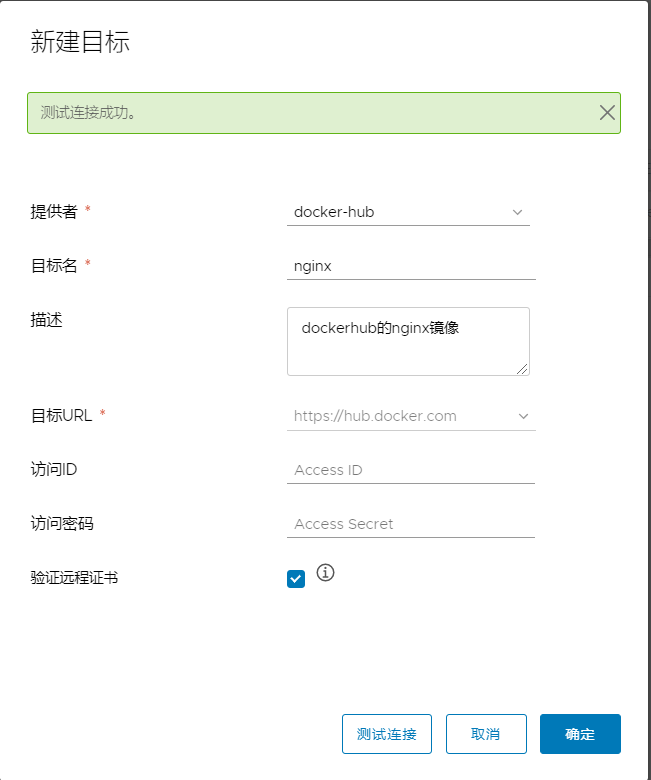
十、同步dockerhub镜像到本地
10.1创建远程仓库
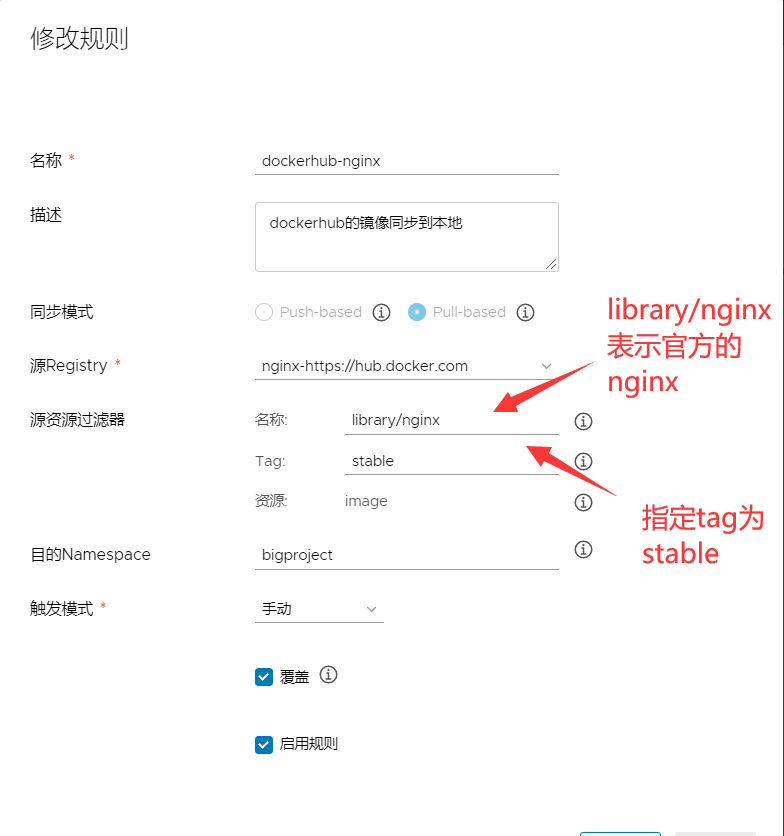
10.2创建同步规则
这里遇到个问题,官方镜像不知道咋同步(之后看官方手册),私人镜像可以用下面方法同步
因为官方镜像直接就是docker pull nginx:stable,直接就是拉镜像,
而私人镜像则是有自己的名字,docker pull bitnami/nginx:latest,表示拉取bitnami这个人的nginx:latest镜像

10.3手动同步

10.4补充:habor同步dockerhub官方镜像
参考:https://github.com/goharbor/harbor/blob/master/docs/user_guide.md#managing-replication
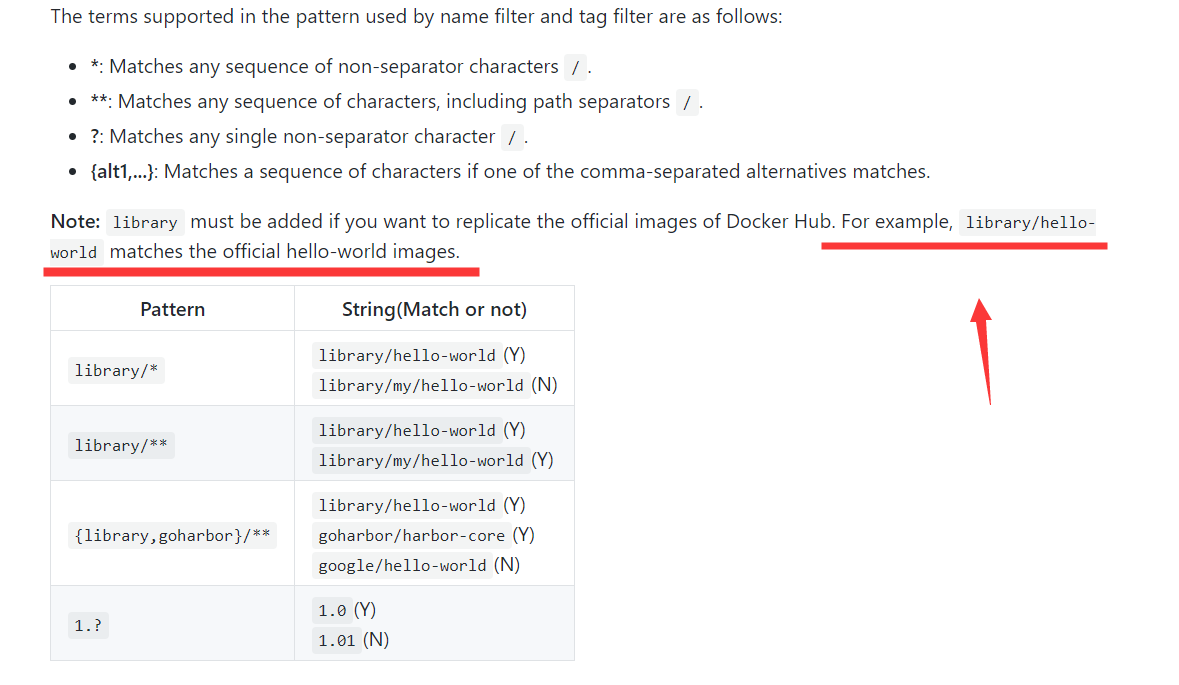
原来library就表示官方镜像