EFK教程 - ElasticSearch角色分离
参考:https://blog.51cto.com/cyent/2450471
启动elasticsearch报错参考:https://my.oschina.net/codingcloud/blog/1615013
用途:
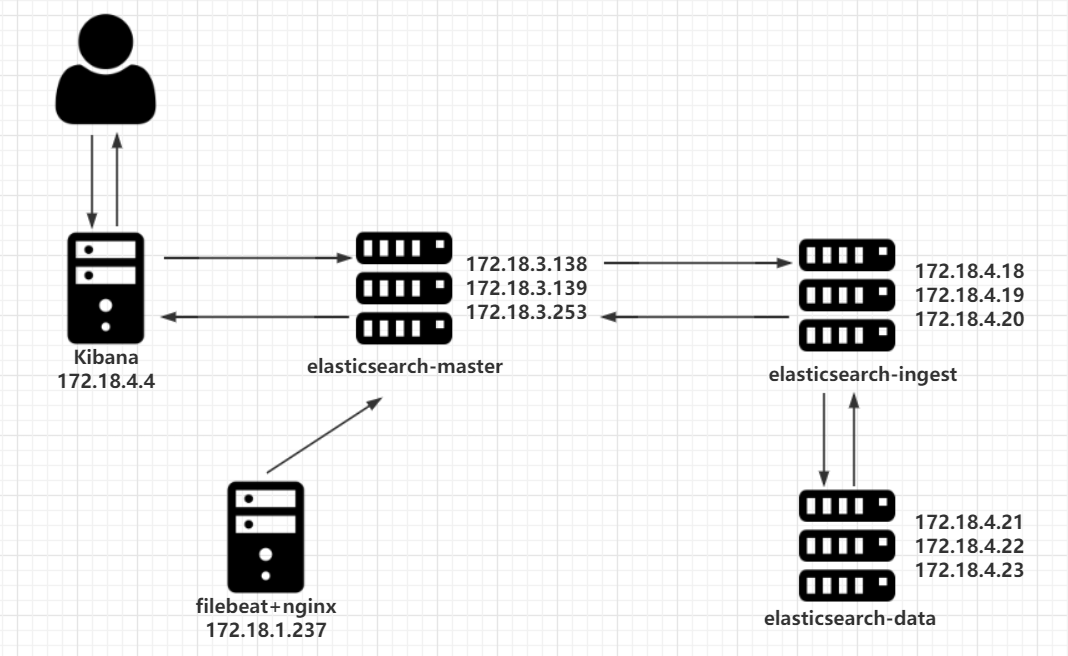
在第一篇《EFK教程 - 快速入门指南》中,阐述了EFK的安装部署,其中ES的架构为三节点,即master、ingest、data角色同时部署在三台服务器上。
在本文中,将进行角色分离部署,并且每个角色分别部署三节点,在实现性能最大化的同时保障高可用。
▷ elasticsearch的master节点:用于调度,采用普通性能服务器来部署
▷ elasticsearch的ingest节点:用于数据预处理,采用性能好的服务器来部署
▷ elasticsearch的data节点:用于数据落地存储,采用存储性能好的服务器来部署
由于条件有限,后面的机器内存只能给1G了
▷ 服务器配置:
| 名称 | IP | CPU | 内存 | SAS硬盘 |
|---|---|---|---|---|
| filebeat | 172.18.1.237 | 2 | 2G | / |
| kibana | 172.18.4.4 | 2 | 2G | / |
| elasticsearch-master-1 | 172.18.3.138 | 4 | 4G | / |
| elasticsearch-master-2 | 172.18.3.139 | 4 | 4G | / |
| elasticsearch-master-3 | 172.18.3.253 | 4 | 4G | / |
| elasticsearch-ingest-1 | 172.18.4.18 | 2 | 1G | / |
| elasticsearch-ingest-2 | 172.18.4.19 | 2 | 1G | / |
| elasticsearch-ingest-3 | 172.18.4.20 | 2 | 1G | / |
| elasticsearch-data-1 | 172.18.4.21 | 1 | 1G | 10G |
| elasticsearch-data-2 | 172.18.4.22 | 1 | 1G | 10G |
| elasticsearch-data-3 | 172.18.4.23 | 1 | 1G | 10G |
▷ 架构图
步骤说明:
1️⃣ 部署3台data节点,加入原集群
2️⃣ 部署3台ingest节点,加入原集群
3️⃣ 将原有的es索引迁移到data节点
4️⃣ 将原有的es节点改造成master节点
一、elasticsearch-data部署
分区的挂载说明
echo -e "n\np\n\n\n\np\nw\n" | fdisk /dev/sdb
sleep 3
partprobe
sleep 1
mkfs.xfs /dev/sdb1
sleep 1
mkdir /data/SAS -p
echo '/dev/sdb1 /data/SAS xfs defaults 0 0' >> /etc/fstab
mount -a
df -h
在三台机器上执行安装脚本
es-data1,es-data2,es-data3
[root@es-data1 ~]# cat install_elasticsearch.sh
mkdir -p /opt/software && cd /opt/software
wget https://artifacts.elastic.co/downloads/elasticsearch/elasticsearch-7.3.2-linux-x86_64.tar.gz
tar -zxvf elasticsearch-7.3.2-linux-x86_64.tar.gz
mv elasticsearch-7.3.2 /opt/elasticsearch
useradd elasticsearch -d /opt/elasticsearch -s /sbin/nologin
mkdir -p /opt/logs/elasticsearch
chown elasticsearch.elasticsearch /opt/elasticsearch -R
chown elasticsearch.elasticsearch /opt/logs/elasticsearch -R
# 数据盘需要elasticsearch写权限
chown elasticsearch.elasticsearch /data/SAS -R

# 限制一个进程可以拥有的VMA(虚拟内存区域)的数量要超过262144,不然elasticsearch会报max virtual memory areas vm.max_map_count [65535] is too low, increase to at least [262144]
echo "vm.max_map_count = 655350" >> /etc/sysctl.conf
sysctl -p
二、elasticsearch-data配置
es-data1(172.18.4.21)
vim /opt/elasticsearch/config/elasticsearch.yml
cluster.name: 007-project
node.name: es-data1
# 数据盘位置,如果有多个硬盘位置,用","隔开
path.data: /data/SAS
path.logs: /opt/logs/elasticsearch
network.host: 172.18.4.21

discovery.seed_hosts: ["es-1", "es-2", "es-3"]
cluster.initial_master_nodes: ["es-1", "es-2","es-3"]
http.cors.enabled: true
http.cors.allow-origin: "*"

# 关闭master功能
node.master: false
# 关闭ingest功能
node.ingest: false
# 开启data功能
node.data: true
es-data2(172.18.4.22)
vim /opt/elasticsearch/config/elasticsearch.yml
cluster.name: 007-project
node.name: es-data2
# 数据盘位置,如果有多个硬盘位置,用","隔开
path.data: /data/SAS
path.logs: /opt/logs/elasticsearch
network.host: 172.18.4.22

discovery.seed_hosts: ["es-1", "es-2", "es-3"]
cluster.initial_master_nodes: ["es-1", "es-2","es-3"]
http.cors.enabled: true
http.cors.allow-origin: "*"

# 关闭master功能
node.master: false
# 关闭ingest功能
node.ingest: false
# 开启data功能
node.data: true
es-data3(172.18.4.23)
vim /opt/elasticsearch/config/elasticsearch.yml
cluster.name: 007-project
node.name: es-data3
# 数据盘位置,如果有多个硬盘位置,用","隔开
path.data: /data/SAS
path.logs: /opt/logs/elasticsearch
network.host: 172.18.4.23

discovery.seed_hosts: ["es-1", "es-2", "es-3"]
cluster.initial_master_nodes: ["es-1", "es-2","es-3"]
http.cors.enabled: true
http.cors.allow-origin: "*"

# 关闭master功能
node.master: false
# 关闭ingest功能
node.ingest: false
# 开启data功能
node.data: true
三、启用master节点和data节点的elasticsearch服务
#elasticsearch启动(master和data共6个节点)
sudo -u elasticsearch /opt/elasticsearch/bin/elasticsearch
报错并解决
参考:https://www.elastic.co/guide/en/elasticsearch/reference/current/max-number-threads-check.html
参考:https://my.oschina.net/codingcloud/blog/1615013
报错**max file descriptors [4096] for elasticsearch process is too low, increase to at least [65536]**是因为操作系统安全检测配置影响的,我们需要切换到root用户下做如下配置:
[root@es-data2 ~]# tail /etc/security/limits.conf
*   soft nofile 128000
*   hard nofile 256000
root soft nofile 128000
root hard nofile 256000
* soft nproc 2048
* hard nproc 4096
大佬说,centos7最好改到/etc/systemd/system.conf里,重启生效,所有服务都会生效
四、查看elaticsearch集群状态
[root@es-ingest1 ~]# curl "http://172.18.3.139:9200/_cat/health?v"
epoch      timestamp cluster     status node.total node.data shards pri relo init unassign pending_tasks max_task_wait_time active_shards_percent
1574081510 12:51:50  007-project green           6         6     10   5    0    0        0             0                  -                100.0%

获取集群节点的列表
可以看到21,22,23在node.role位置只有个d表示数据节点
[root@es-ingest1 ~]# curl http://172.18.3.138:9200/_cat/nodes?v
ip           heap.percent ram.percent cpu load_1m load_5m load_15m node.role master name
172.18.4.23             9          92   3    0.04    0.06     0.13 d         -      es-data3
172.18.3.253           18          68   0    0.01    0.03     0.05 dim       -      es-3
172.18.3.139           33          97   0    0.00    0.01     0.05 dim       -      es-2
172.18.3.138           31          91   0    0.01    0.02     0.05 dim       *      es-1
172.18.4.21            11          93   2    0.00    0.02     0.13 d         -      es-data1
172.18.4.22            12          93   3    0.00    0.04     0.10 d         -      es-data2
status: green  # 集群健康状态
node.total: 6  # 有6台机子组成集群
node.data: 6  # 有6个节点的存储
node.role: d  # 只拥有data角色
node.role: i  # 只拥有ingest角色
node.role: m  # 只拥有master角色
node.role: mid  # 拥master、ingest、data角色
五、elasticsearch-ingest部署
现需要新增三台ingest节点加入集群,同时关闭master和data功能
elasticsearch-ingest安装:3台es均执行相同的安装步骤
[root@es-ingest2 ~]# cat install_elasticsearch.sh
mkdir -p /opt/software && cd /opt/software
wget https://artifacts.elastic.co/downloads/elasticsearch/elasticsearch-7.3.2-linux-x86_64.tar.gz
tar -zxvf elasticsearch-7.3.2-linux-x86_64.tar.gz
mv elasticsearch-7.3.2 /opt/elasticsearch
useradd elasticsearch -d /opt/elasticsearch -s /sbin/nologin
mkdir -p /opt/logs/elasticsearch
chown elasticsearch.elasticsearch /opt/elasticsearch -R
chown elasticsearch.elasticsearch /opt/logs/elasticsearch -R

# 限制一个进程可以拥有的VMA(虚拟内存区域)的数量要超过262144,不然elasticsearch会报max virtual memory areas vm.max_map_count [65535] is too low, increase to at least [262144]
echo "vm.max_map_count = 655350" >> /etc/sysctl.conf
sysctl -p
六、elasticsearch-ingest配置
es-ingest1
vim /opt/elasticsearch/config/elasticsearch.yml
cluster.name: 007-project
node.name: es-ingest1
path.logs: /opt/logs/elasticsearch
network.host: 172.18.4.18
discovery.seed_hosts: ["es-1", "es-2", "es-3"]
cluster.initial_master_nodes: ["es-1", "es-2","es-3"]

http.cors.enabled: true
http.cors.allow-origin: "*"

# 关闭master功能
node.master: false
# 开启ingest功能
node.ingest: true
# 关闭data功能
node.data: false
es-ingest2
vim /opt/elasticsearch/config/elasticsearch.yml
cluster.name: 007-project
node.name: es-ingest2
path.logs: /opt/logs/elasticsearch
network.host: 172.18.4.19
discovery.seed_hosts: ["es-1", "es-2", "es-3"]
cluster.initial_master_nodes: ["es-1", "es-2","es-3"]

http.cors.enabled: true
http.cors.allow-origin: "*"

# 关闭master功能
node.master: false
# 开启ingest功能
node.ingest: true
# 关闭data功能
node.data: false
es-ingest3
vim /opt/elasticsearch/config/elasticsearch.yml
cluster.name: 007-project
node.name: es-ingest3
path.logs: /opt/logs/elasticsearch
network.host: 172.18.4.20
discovery.seed_hosts: ["es-1", "es-2", "es-3"]
cluster.initial_master_nodes: ["es-1", "es-2","es-3"]

http.cors.enabled: true
http.cors.allow-origin: "*"

# 关闭master功能
node.master: false
# 开启ingest功能
node.ingest: true
# 关闭data功能
node.data: false
七、启动ingest节点的elasticsearch
三个节点都要启动(注意修改nproc,避免报错)
sudo -u elasticsearch /opt/elasticsearch/bin/elasticsearch
修改nproc
cat >> /etc/security/limits.conf <<EOF
* soft nproc 2048
* hard nproc 4096
*   soft nofile 128000
*   hard nofile 256000
root soft nofile 128000
root hard nofile 256000
EOF
#然后重新打开终端
八、查看elasticsearch集群状态
查看集群的健康状态
[root@es-master2 ~]# curl http://172.18.3.138:9200/_cat/health?v
epoch      timestamp cluster     status node.total node.data shards pri relo init unassign pending_tasks max_task_wait_time active_shards_percent
1573885526 06:25:26  007-project green           9         6     10   5    0    0        0             0                  -                100.0%

获取集群节点的列表
可以看到es-ingest节点的node.role位置只有个i,表示只拥有ingest角色,此时master节点还是dim
[root@es-master2 ~]# curl http://172.18.3.138:9200/_cat/nodes?v
ip           heap.percent ram.percent cpu load_1m load_5m load_15m node.role master name
172.18.3.253           16          68   0    0.08    0.04     0.05 dim       -      es-3
172.18.4.23             8          94   0    0.00    0.01     0.05 d         -      es-data3
172.18.4.20            23          93   6    0.20    0.43     0.30 i         -      es-ingest3
172.18.3.138            8          91   0    0.09    0.05     0.05 dim       *      es-1
172.18.4.22            10          94   0    0.00    0.01     0.05 d         -      es-data2
172.18.3.139           31          96   0    0.02    0.04     0.05 dim       -      es-2
172.18.4.18            22          93   7    0.24    0.53     0.35 i         -      es-ingest1
172.18.4.21            10          93   0    0.05    0.05     0.05 d         -      es-data1
172.18.4.19            23          93   5    0.28    0.56     0.36 i         -      es-ingest2
九、elasticsearch-master部署
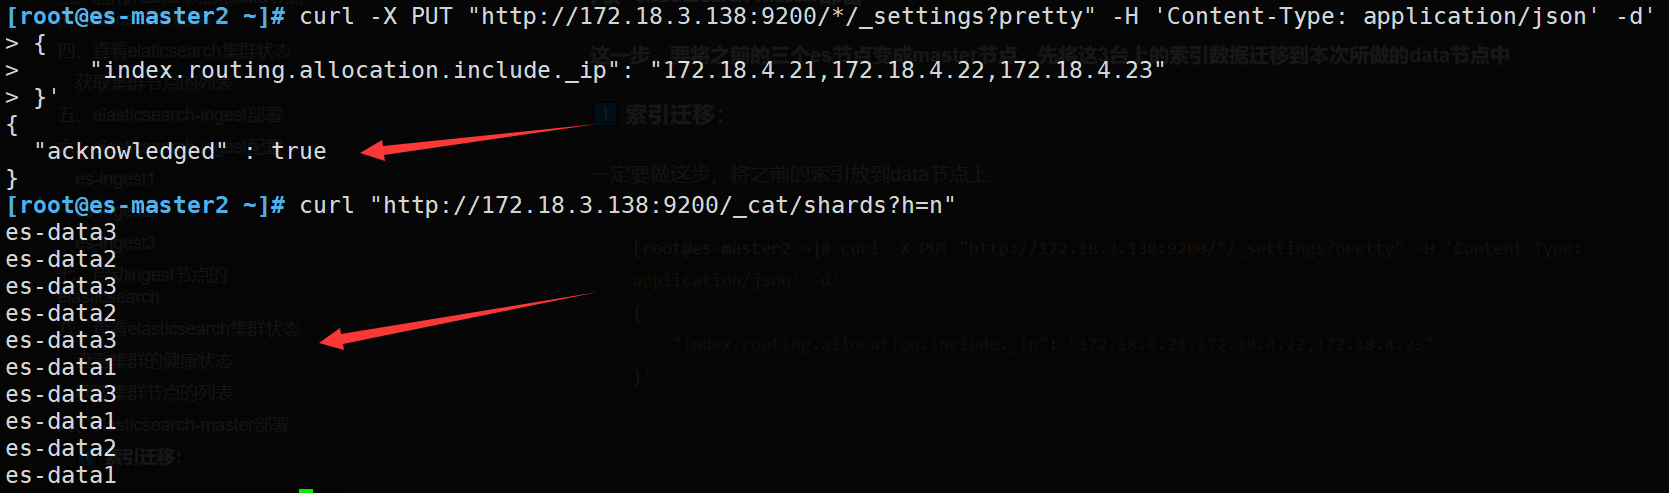
这一步,要将之前的三个es节点变成master节点,先将这3台上的索引数据迁移到本次所做的data节点中
1️⃣ 索引迁移:
一定要做这步,将之前的索引放到data节点上
#当前索引分布在es-1,es-2,es-3,es-data1,es-data2,es-data36个节点上
[root@es-master2 ~]# curl "http://172.18.3.138:9200/_cat/shards?h=n"
es-data2
es-2
es-data3
es-2
es-data3
es-data1
es-3
es-1
es-3
es-1
[root@es-master2 ~]# curl -X PUT "http://172.18.3.138:9200/*/_settings?pretty" -H 'Content-Type: application/json' -d'
{
    "index.routing.allocation.include._ip": "172.18.4.21,172.18.4.22,172.18.4.23"
}'
2️⃣ 确认当前索引存储位置:
确认所有索引不在192.168.1.31、192.168.1.32、192.168.1.33节点上
[root@es-master2 ~]# curl "http://172.18.3.138:9200/_cat/shards?h=n"
es-data3
es-data2
es-data3
es-data2
es-data3
es-data1
es-data3
es-data1
es-data2
es-data1
3️⃣然后修改配置,重启服务
必须一台一台修改配置然后重启master节点的elasticsearch服务,先CTRL+C终止,然后改配置,重启,确认好了再改第二台
启动命令
sudo -u elasticsearch /opt/elasticsearch/bin/elasticsearch
es-master1(172.18.3.138)
vim /opt/elasticsearch/config/elasticsearch.yml
cluster.name: 007-project
node.name: es-1
path.logs: /opt/logs/elasticsearch
network.host: 172.18.3.138
#那个端口应该是默认的默认就是9200和9300,不写也可以
discovery.seed_hosts: ["es-1", "es-2", "es-3"]
http.cors.enabled: true
http.cors.allow-origin: "*"
cluster.initial_master_nodes: ["es-1", "es-2","es-3"]
gateway.recover_after_nodes: 2

#仅开启master功能
node.master: true
node.ingest: false
node.data: false
es-master2(172.18.3.139)
vim /opt/elasticsearch/config/elasticsearch.yml
cluster.name: 007-project
node.name: es-2
path.logs: /opt/logs/elasticsearch
network.host: 172.18.3.139

discovery.seed_hosts: ["es-1", "es-2", "es-3"]
http.cors.enabled: true
http.cors.allow-origin: "*"
cluster.initial_master_nodes: ["es-1", "es-2","es-3"]
gateway.recover_after_nodes: 2

node.master: true
node.ingest: false
node.data: false
es-master3(172.18.3.253)
vim /opt/elasticsearch/config/elasticsearch.yml
cluster.name: 007-project
node.name: es-3
path.logs: /opt/logs/elasticsearch
network.host: 172.18.3.253

discovery.seed_hosts: ["es-1", "es-2", "es-3"]
http.cors.enabled: true
http.cors.allow-origin: "*"
cluster.initial_master_nodes: ["es-1", "es-2","es-3"]
gateway.recover_after_nodes: 2
#仅开启master功能
node.master: true
node.ingest: false
node.data: false
十、查看elasticsearch集群状态
查看集群的健康状态
[root@es-master1 ~]# curl http://172.18.3.138:9200/_cat/health?v
epoch      timestamp cluster     status node.total node.data shards pri relo init unassign pending_tasks max_task_wait_time active_shards_percent
1573887879 07:04:39  007-project green           9         3     10   5    0    0        0             0                  -                100.0%

获取集群节点的列表
可以看到,3个m,3个d,3个i
[root@es-master1 ~]# curl http://172.18.3.138:9200/_cat/nodes?v
ip           heap.percent ram.percent cpu load_1m load_5m load_15m node.role master name
172.18.3.138           27          90   0    0.04    0.06     0.05 m         *      es-1
172.18.3.253           27          66   2    0.02    0.09     0.08 m         -      es-3
172.18.4.18            18          93   0    0.00    0.01     0.07 i         -      es-ingest1
172.18.4.19            28          92   0    0.00    0.01     0.05 i         -      es-ingest2
172.18.4.20            29          93   0    0.00    0.02     0.05 i         -      es-ingest3
172.18.4.21            11          93   0    0.01    0.03     0.05 d         -      es-data1
172.18.3.139           17          96   0    0.07    0.06     0.05 m         -      es-2
172.18.4.22            11          94   0    0.00    0.03     0.05 d         -      es-data2
172.18.4.23             9          92   0    0.00    0.01     0.05 d         -      es-data3
至此,集群的角色分离就完成了
十一、其他内容
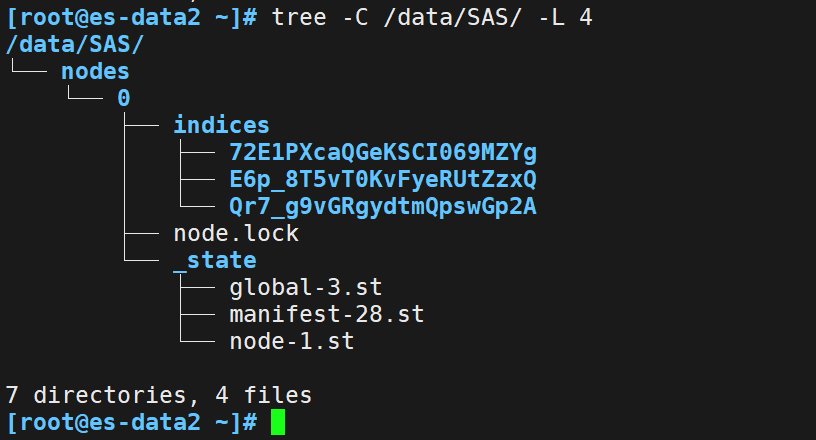
1、data节点目录结构