ubuntu18.04 server基础学习
一、安装
略,
镜像快速下载:mirrors.aliyun.com;mirrors.huaweicloud.com
二、基本配置
2.1更改主机名:
root@qqq:~# hostnamectl set-hostname node1
root@node1:~# sed 's/^preserve_hostname: false/preserve_hostname: true/g' /etc/cloud/cloud.cfg -i
2.2更改网卡为eth0
一定要修改/etc/netplan/01-netcfg.yaml中网卡名字,否则后果很严重
root@node1:~# sed -ri '/^GRUB_CMDLINE/s/(.*)"/\1 net.ifnames=0 biosdevname=0"/' /etc/default/grub
#使用update-grub或者grub-mkconfig -o  /boot/grub/grub.cfg
root@node1:~# update-grub
2.3网络配置
DHCP配置
root@node1:~# cat /etc/netplan/50-cloud-init.yaml
network:
    ethernets:
        eth0:
            dhcp4: true
    version: 2
root@node1:~# netplan apply
static配置
可以看man帮助:man netplan
root@node1:~# cat /etc/netplan/50-cloud-init.yaml
network:
  ethernets:
    eth0:
      dhcp4: false
      addresses:
        - 172.18.1.87/16
        - 172.18.1.88/16
      gateway4: 172.18.0.1
      nameservers:
        addresses:
          - 123.123.123.123
          - 8.8.8.8
  version: 2
root@node1:~# netplan apply
如果需要配置路由也可以
可以参考man netplan
root@node1:~# cat /etc/netplan/50-cloud-init.yaml
# This file is generated from information provided by
# the datasource.  Changes to it will not persist across an instance.
# To disable cloud-init's network configuration capabilities, write a file
# /etc/cloud/cloud.cfg.d/99-disable-network-config.cfg with the following:
# network: {config: disabled}
network:
  ethernets:
    eth0:
      dhcp4: false
      addresses:
        - 172.18.1.87/16
        - 172.18.1.88/16
      gateway4: 172.18.0.1
      nameservers:
        addresses:
          - 123.123.123.123
          - 8.8.8.8
      routes:
        - to: 172.18.0.0/16
          via: 172.18.0.1
  version: 2
单网卡桥接
root@node1:~# cat /etc/netplan/50-cloud-init.yaml
# This file is generated from information provided by
# the datasource.  Changes to it will not persist across an instance.
# To disable cloud-init's network configuration capabilities, write a file
# /etc/cloud/cloud.cfg.d/99-disable-network-config.cfg with the following:
# network: {config: disabled}
network:
  ethernets:
    eth0:
      dhcp4: true
  bridges:
    br0:
      interfaces: [eth0]
      dhcp4: false
      addresses:
        - 172.18.1.87/16
        - 172.18.1.88/16
      gateway4: 172.18.0.1
      nameservers:
        addresses:
          - 123.123.123.123
          - 8.8.8.8
  version: 2
root@node1:~# netplan apply
多网卡桥接
root@node1:~# cat /etc/netplan/50-cloud-init.yaml
# This file is generated from information provided by
# the datasource.  Changes to it will not persist across an instance.
# To disable cloud-init's network configuration capabilities, write a file
# /etc/cloud/cloud.cfg.d/99-disable-network-config.cfg with the following:
# network: {config: disabled}
network:
  ethernets:
    eth0:
      dhcp4: true
    eth1:
      dhcp4: true
  bridges:
    br0:
      interfaces: [eth0]
      dhcp4: false
      addresses:
        - 172.18.1.87/16
        - 172.18.1.88/16
      gateway4: 172.18.0.1
      nameservers:
        addresses:
          - 123.123.123.123
          - 8.8.8.8
    br1:
      interfaces: [eth1]
      dhcp4: false
      addresses: [192.168.38.188/24]
      gateway4: 192.168.38.2
      nameservers:
        addresses: [223.6.6.6]
  version: 2
root@node1:~# netplan apply
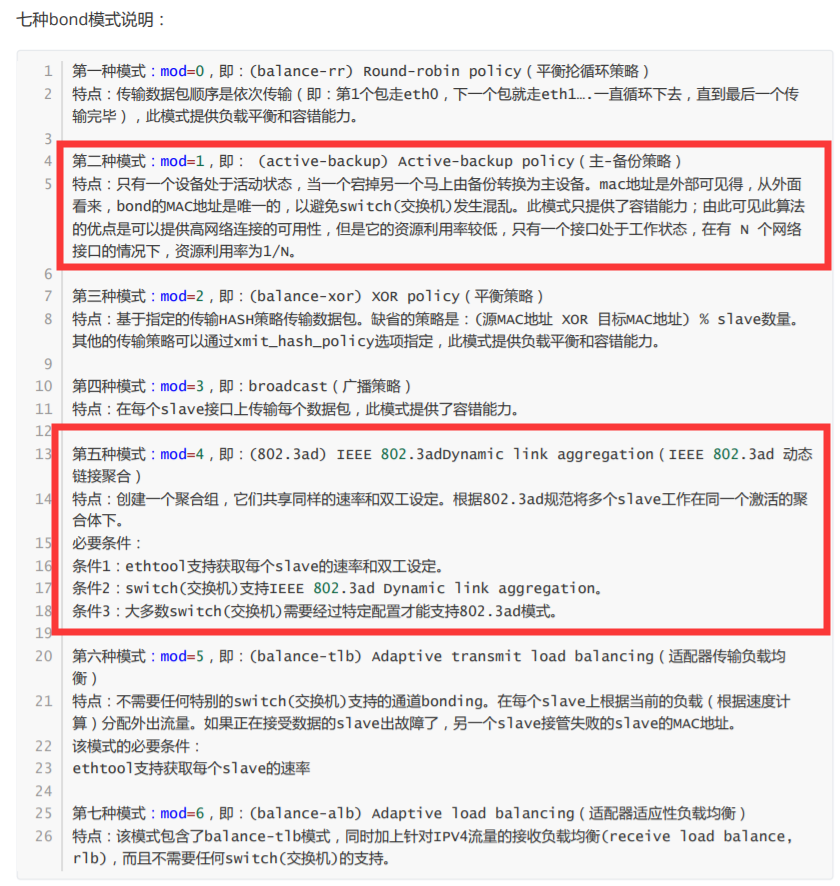
双网卡绑定
常用主备模式和链路聚合,链路聚合需要交换机做配置;网卡配置可以参考man netplan
root@node1:~# cat /etc/netplan/50-cloud-init.yaml
# This file is generated from information provided by
# the datasource. Changes to it will not persist across an instance.
# To disable cloud-init's network configuration capabilities, write a file
# /etc/cloud/cloud.cfg.d/99-disable-network-config.cfg with the following:
# network: {config: disabled}
network:
ethernets:
eth0:
dhcp4: false #关闭eth0的dhcp
eth1:
dhcp4: true
eth2:
dhcp4: false #关闭eth2的dhcp
bonds: #虚拟设备有三种,bridge,bonds,vlan
bond0: #定义名字为bond0
interfaces: #设备列表,加上两个网卡
- eth0
- eth2
addresses: [172.18.1.87/16] #ip
gateway4: 172.18.0.1 #网关
nameservers: #dns
addresses:
- 123.123.123.123
- 8.8.8.8
parameters: #绑定参数
mode: active-backup #主备模式
mii-monitor-interval: 100 #mii监视间隔100毫秒
bridges:
br1:
interfaces: [eth1]
dhcp4: false
addresses: [192.168.38.188/24]
gateway4: 192.168.38.2
nameservers:
addresses: [223.6.6.6]
version: 2
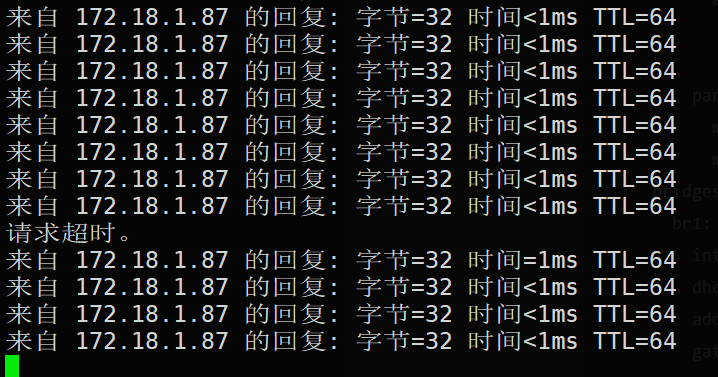
root@node1:~# netplan apply #我这里重启了才生效,
经测试断开一个网卡有个丢包
多网卡绑定+桥接
桥接的网卡可以给桥接设备使用:
root@node1:~# cat /etc/netplan/50-cloud-init.yaml
network:
  ethernets:
    eth0:
      dhcp4: false
    eth1:
      dhcp4: true
    eth2:
      dhcp4: false
  bonds:
    bond0:
      interfaces:
        - eth0
        - eth2
      parameters:
        mode: active-backup
        mii-monitor-interval: 100
  bridges:
    br0:
      interfaces: [bond0]
      dhcp4: false
      addresses: [172.18.1.87/16]
      gateway4: 172.18.0.1
      nameservers:
        addresses:
          - 123.123.123.123
          - 8.8.8.8
    br1:
      interfaces: [eth1]
      dhcp4: false
      addresses: [192.168.38.188/24]
      gateway4: 192.168.38.2
      nameservers:
        addresses: [223.6.6.6]
  version: 2
2.4apt仓库
阿里云文档
cp -a /etc/apt/sources.list /etc/apt/sources.list.bak

cat > /etc/apt/sources.list <<'EOF'
deb http://mirrors.aliyun.com/ubuntu/ bionic main restricted universe multiverse
deb-src http://mirrors.aliyun.com/ubuntu/ bionic main restricted universe multiverse

deb http://mirrors.aliyun.com/ubuntu/ bionic-security main restricted universe multiverse
deb-src http://mirrors.aliyun.com/ubuntu/ bionic-security main restricted universe multiverse

deb http://mirrors.aliyun.com/ubuntu/ bionic-updates main restricted universe multiverse
deb-src http://mirrors.aliyun.com/ubuntu/ bionic-updates main restricted universe multiverse

deb http://mirrors.aliyun.com/ubuntu/ bionic-proposed main restricted universe multiverse
deb-src http://mirrors.aliyun.com/ubuntu/ bionic-proposed main restricted universe multiverse

deb http://mirrors.aliyun.com/ubuntu/ bionic-backports main restricted universe multiverse
deb-src http://mirrors.aliyun.com/ubuntu/ bionic-backports main restricted universe multiverse
EOF
apt update
华为云文档:
cp -a /etc/apt/sources.list /etc/apt/sources.list.bak
sed -i "s@http://.*archive.ubuntu.com@http://mirrors.huaweicloud.com@g" /etc/apt/sources.list
sed -i "s@http://.*security.ubuntu.com@http://mirrors.huaweicloud.com@g" /etc/apt/sources.list
apt update
2.5apt命令
# apt 1ist #apt列出仓库软件包,等于yum list
# apt search NAME #搜索安装包
# apt show apache2 #查看某个安装包的详细信息
# apt install apache2 #在线安装软件包
# apt remove apache2 #卸载单个软件包但是保留配置文件
# apt autoremove apache2 #删除安装包并解决依赖关系
# apt update #更新本地软件包列表索引 ,修改了apt仓库后必须执行
# apt purge apache2 #卸载单个软件包删除配置文件
# apt upgrade #升级所有已安装且可升级到新版本的软件包
# apt full-upgrade #升级整个系统,必要时可以移除旧软件包。
# apt edit-sources #编辑source源文件
# apt-cache madison nginx #查看仓库中软件包有哪些版本可以安装
# apt install nginx=1.14.0-0ubuntu1.6 #安装软件包的时候指定安装具体的版本
2.6设置JDK环境
apt安装
root@node1:~#  apt install openjdk-8-jdk -y
root@node1:~# java -version
openjdk version "1.8.0_222"
OpenJDK Runtime Environment (build 1.8.0_222-8u222-b10-1ubuntu1~18.04.1-b10)
OpenJDK 64-Bit Server VM (build 25.222-b10, mixed mode)
二进制包包安装
# pwd
/usr/1oca1/src
解压二进制文件并设置软连接:
# tar xf jdk-8u212-1inux-x64. tar.gz
# 1n -sv /usr/1oca1/src/jdk1.8.0 212 /usr/local/jdk
配置环境变量:
# vim /etc/profile
export JAVA HOME=/usr/1oca1/jdk
export PATH=SJAVA_ HOME/bin: SJAVA_ HOME/jre/bin:$PATH
export
CLASSPATH= . SCLASSPATH: $JAVA HOME/1ib:$JAVA HOME/ire/1ib:$JAVA HOME/1ib/tools. jar
重新导入环境变量并验证:
# source
/etc/profile
# java -version
java version "1.8.0 212”
Java(TM) SE Runtime Envi ronment (build 1.8.0_ 212-b10)
Java HotSpot(TM) 64-Bit Server VM (build 25.212-b10, mixed mode)
2.7系统基础包安装
#摘抄过来的,卸载防火墙,linux容器,不知道啥,还是不要卸载了
# apt purge ufw lxd lxd-client 1xcfs 1xc-comon
#安装基础包
# apt install iproute2 ntpdate tcpdump telnet traceroute nfs-kernel-server nfs-common lrzsz tree openss1 libss1-dev libpcre3 libpcre3-dev zlib1g-dev ntpdate tcpdump telnet traceroute gcc openssh-server 1rzsz tree openss1 libss1-dev libpcre3 libpcre3-dev zlib1g-dev ntpdate tcpdump telnet traceroute iotop unzip zip
2.8文件句柄等系统资源优化
root@node1:~# grep -v ^# /etc/security/limits.conf | grep -v ^$
*               hard    core            128000
root            hard    core            128000
*               soft    core            128000
root            soft    core            128000
*	        hard    nproc           10000
root	        hard    nproc           10000
*	        soft    nproc           10000
root	        soft    nproc           10000
*	        hard    memlock         32000
root	        hard    memlock         32000
*	        soft    memlock         32000
root	        soft    memlock         32000
*	        hard    nofile          128000
root	        hard    nofile          128000
*	        soft    nofile          128000
root	        soft    nofile          128000
*	        hard    msgqueue        8192000
root	        hard    msgqueue        8192000
*	        soft    msgqueue        8192000
root	        soft    msgqueue        8192000
#新开shell即可生效
2.9内核参数优化
之前公司的优化
cat > /etc/sysctl.d/kernel_tuning.conf <<EOF
# Syncookies make SYN flood attacks ineffective
net.ipv4.tcp_syncookies = 1

# Ignore bad ICMP
net.ipv4.icmp_echo_ignore_broadcasts = 1
net.ipv4.icmp_ignore_bogus_error_responses = 1

# Disable ICMP Redirect Acceptance
net.ipv4.conf.all.accept_redirects = 0

# Enable IP spoofing protection, turn on source route verification
net.ipv4.conf.all.rp_filter = 0

# Log Spoofed Packets, Source Routed Packets, Redirect Packets
net.ipv4.conf.all.log_martians = 1

# Reply to ARPs only from correct interface (required for DSR load-balancers)
net.ipv4.conf.all.arp_announce = 2
net.ipv4.conf.all.arp_ignore = 1
fs.file-max = 1024000

net.ipv4.tcp_max_syn_backlog = 4096
net.core.netdev_max_backlog =  32768
net.core.somaxconn = 4096

net.core.wmem_default = 8388608
net.core.rmem_default = 8388608
net.core.rmem_max = 16777216
net.core.wmem_max = 16777216

net.ipv4.tcp_timestamps = 1
net.ipv4.tcp_synack_retries = 2
net.ipv4.tcp_syn_retries = 2

#net.netfilter.nf_conntrack_tcp_timeout_time_wait=30

#net.ipv4.tcp_tw_recycle = 0
net.ipv4.tcp_tw_reuse = 1

net.ipv4.tcp_fin_timeout = 30
#net.ipv4.tcp_keepalive_time = 60
net.ipv4.ip_local_port_range = 1024  65535
#net.netfilter.nf_conntrack_tcp_timeout_time_wait = 30

#net.ipv4.ip_conntrack_max = 250000
net.ipv4.tcp_max_tw_buckets = 1440000
net.ipv4.tcp_keepalive_time = 1200
net.ipv4.tcp_keepalive_intvl = 5
net.ipv4.tcp_keepalive_probes = 5

#net.netfilter.nf_conntrack_max = 1280000

vm.swappiness = 0
EOF
sysctl -p /etc/sysctl.d/kernel_tuning.conf
2.10dpkg安装包管理:
# dpkg -i gitlab-ce 11.9. 8-ce.0_ _amd64.deb #安装某个软件包
# dpkg -r git1ab-ce #删除某个软件包保留配置文件
# dpkg -r -P gitlab-ce #删除某个软件包不保留配置文件
# dpkg -I gitlab-ce_11.9.8-ce.0_amd64. deb #查看软件包信息
# dpkg -C gitlab-ce_11.9.8-ce.0amd64.deb #查看软件包内的文件及 目录内容
# dpkg -1 #列出本机已经安装的所有软件
2.11安装nginx
#查看所有版本
root@node1:~# apt-cache madison nginx
     nginx | 1.14.0-0ubuntu1.6 | http://mirrors.aliyun.com/ubuntu bionic-security/main amd64 Packages
     nginx | 1.14.0-0ubuntu1.6 | http://mirrors.aliyun.com/ubuntu bionic-updates/main amd64 Packages
     nginx | 1.14.0-0ubuntu1 | http://mirrors.aliyun.com/ubuntu bionic/main amd64 Packages
     nginx | 1.14.0-0ubuntu1 | http://mirrors.aliyun.com/ubuntu bionic/main Sources
     nginx | 1.14.0-0ubuntu1.6 | http://mirrors.aliyun.com/ubuntu bionic-security/main Sources
     nginx | 1.14.0-0ubuntu1.6 | http://mirrors.aliyun.com/ubuntu bionic-updates/main Sources
root@node1:~# apt install nginx=1.14.0-0ubuntu1.6 -y
root@node1:~# ps -ef | grep nginx   #直接启动
root      13023      1  0 03:22 ?        00:00:00 nginx: master process /usr/sbin/nginx -g daemon on; master_process on;
www-data  13025  13023  0 03:22 ?        00:00:00 nginx: worker process
www-data  13026  13023  0 03:22 ?        00:00:00 nginx: worker process
www-data  13027  13023  0 03:22 ?        00:00:00 nginx: worker process
www-data  13028  13023  0 03:22 ?        00:00:00 nginx: worker process
root      13091  12286  0 03:22 pts/1    00:00:00 grep --color=auto nginx
ubuntu16配置的是/etc/network/interfaces